Edit the admin post type title column

To edit the Admin header of your new post type page you need to add the following code:

add_action(‘admin_head-edit.php‘,’edit_change_title_function’);

in your function you have to check if the post type is the one you need, and then apply a filter for the title

function edit_change_title_function(){
global$post;
if($post->post_type == 'posttype_name') {
add_filter('the_title','posttype_title_function',100,2);
}
}

So, you can override the title getting the value from db:

function posttype_title_function($title, $post_id) {
$new_title = get_post_meta($post_id,'slb_first_name',true) .' '.get_post_meta($post_id,'slb_last_name',true);
return $new_title;
}
WordPress Custom Fields (meta key)

A custom fields are, basically, the properties for a post type.

The creation phase of a custom field is divided in two parts:

  1. Creation of the structure
  2. Define the behavior

Creation of the structure

Metabox is the graphic container of our custom fields. It will appear as a fieldsets in the admin page, containing our custom fields.

add_action('add_meta_boxes_{post_type_name}','add_metabox_function');

function add_metabox_function($post)
{
  add_meta_box('id','title','metabox_field_function','post_type_name','normal','default');
}

This function will contain all necessary html, CSS and logical code to manage and show our custom fields.

function metabox_field_function()
{
  //html code to show fields and php code to manage fields
}

One interesting thing is that you don’t have to define an html form and a submit button, because your code will be automatically wrapped in.
So: no form and no submit butto, but the normal html input tag.

After defining the html field in the previous step it’s time to manage the submit of your metadata.

The hook to define it is:

add_action('save_post','save_posttypename_meta', 10, 2);
and the function to manage it:
function save_posttypename_meta($post_id, $post) 
{
  //php code to get fields from POST and save them into db
}

Define the behavior

With this variable you can access directly to your wordpress database to make query, access tables and so on

global $wpdb;
Ex. to get the list of content of a custo post type slb_list
$list_query=$wpdb->get_results("select ID, post_title from {$wpdb->posts} where post_type='slb_list' and post_status in ('draft', 'publish')");

Ex. get the post id

$post_id = $post->ID;


to read custom field value from the DB, you can use this code the wordpress function “get_post_meta”:

$first_name = (!empty(get_post_meta($post_id, 'slb_first_name', true))) ? get_post_meta($post_id, 'slb_first_name', true) : '';

Basically it takes the custom field value of that post_id and that custom field name

To take parameter value from a http request (after a submit) in PHP you have to do like this:

$first_name = ( isset($_POST['slb_first_name']) ) ? sanitize_text_field($_POST['slb_first_name']) : '';


To add a customfield, and its value, do this:

add_post_meta( $post_id, 'customfield_name', value, true/false );

The last parameter means that you want to exlude (true) or you don’t mind (false) duplicated values of that custom field for that post_id 

to update a custom field:

update_post_meta($post_id, ‘customfield_name’, value);
To delete the existing list meta for that post id:
delete_post_meta( $post_id, 'customfield_name');

Yes, all values of that custom fields will be deleted, even if you associated more than one value.

WordPress Custom Post Type

Post types are a way to categorize different types of content in WordPress.

WordPress has already the following native post type:

  • Post
  • Pages
  • Attachments
  • Revisions
  • Navigation menu
  • custom CSS
  • Changeset

Most probably you just knew about the first three in the list.

And you can extend these wordpress post type with your own.

To do this you here it is a little function recap.


There is another way to create a custom post type. It’s using the plugin Custom Post Type UI (or CPTUI). In this case you can create your post types directly in the wordpress admin with a simple UI.

Of course it depends on what you need from Custom Post Types.

If you are creating a plugin it’s better to create them inside it.

If you need them only for you personal use then it’s easer to use CPTUI.


That’s it

WordPress Shortcodes

Here it is a little schema to recap the creation of a wp shortcode

But how we can submit data through shortcodes?

Here it is.

you need to register two ajax function:

add_action('wp_ajax_nopriv_{save_your_posttype_function}', 'save_your_posttype_function'); // regular website visitor
add_action('wp_ajax_{save_your_posttype_function}', 'save_your_posttype_function'); // admin user

The submit action inside your shortcode must be something like this:

action="/wp-admin/admin-ajax.php?action=save_your_posttype_function" method="post"

and finally you can implement that function:

function slb_save_subscription() {
...
//after saving your data you have to return a json
if( $data_saved ):
  $result['status']=1;
  $result['message']='Data saved';
endif;

// encode result as json string
$json_result = json_encode( $result );

// return result
die( $json_result );

// stop all other processing
exit;

}
Java application as Linux Service in 4 steps

If you are reading this post then, probably, you need to execute your java app as a Linux service.

This can be done in 4 really easy steps

  • Create the service
  • create a bash script
  • give execution permission to the bash file
  • enable and start your brand new service

Step 1: create the system service

sudo nano /etc/systemd/system/MyFantasticJavaApp.service

it will open the nano editor. Add the following, changing the working directory and the User values based on your convenience

                                                                                                 
 [Unit]
 Description=good old Java application
 [Service]
 User=root  
 # The configuration file application.properties should be here:
 # change this with your workspace
 WorkingDirectory=/usr/local/javaproject/

 #path to executable.
 #executable is a bash script which calls jar file
 ExecStart=/usr/local/javaproject/myBashFile
 SuccessExitStatus=143
 TimeoutStopSec=10
 Restart=on-failure
 RestartSec=5
 [Install]
 WantedBy=multi-user.target

save the file (Ctrl-X, select Y(es) and press enter)

Step 2: create the bash script

Now let’s create a script which will basically call our jar/war file.

This file has to be the one specified in previous service file (what we call in ExecStart value). So, let’s write:

sudo nano /usr/local/javaproject/myBashFile

it will open (again) the nano editor. Add the following 2(two) lines, changing the port and the path to your jar/war file

#!/bin/sh
 sudo /usr/bin/java -Dserver.port=7080  -jar /usr/local/javaproject/MyFantasticJavaApp.jar

save the file (Ctrl-X, select Y(es) and press enter)

Step 3: give execution permission to the basch script

this is the simpler step. Just write this, changing the file and his path:

sudo chmod u+x /usr/local/javaproject/myBashFile

Step 4, almost there: let’s play the new service

sudo systemctl daemon-reload
sudo systemctl enable MyFantasticJavaApp.service
sudo systemctl start MyFantasticJavaApp

Et voila! Do not thank me!

Two raspberry command line every newbie has to know

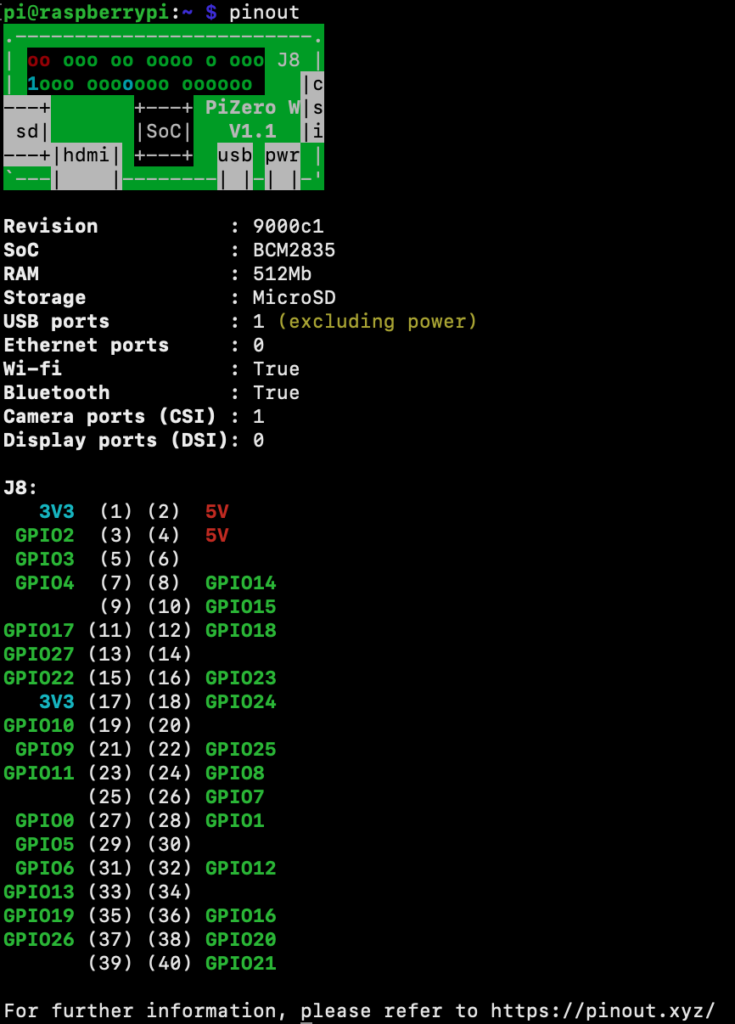
1) pinout

This tool is provided by the GPIO Zero Python library, 

It allows you to know better the GPIO map of your raspberry. So GPIO number, which are for 5v/3.3v and which are for negatives

Installation

Before we can use the pinout tool, we need to first update the package list by running the following command.

sudo apt update

Then, we can install the package that will provide us with the pinout tool by using the command below.

sudo apt install python3-gpiozero

and finally

pinout

2) gpio readall

Basically the library name is WiringPi, and you can use it to manage many of the functionalities provided by the GPIO header: digital pins, SPI, I2C, UART, etc.

to installi it:

sudo apt-get install wiringpi

to check if the installation went ok:

gpio -v

Ok, now it’s the moment to show it in action:

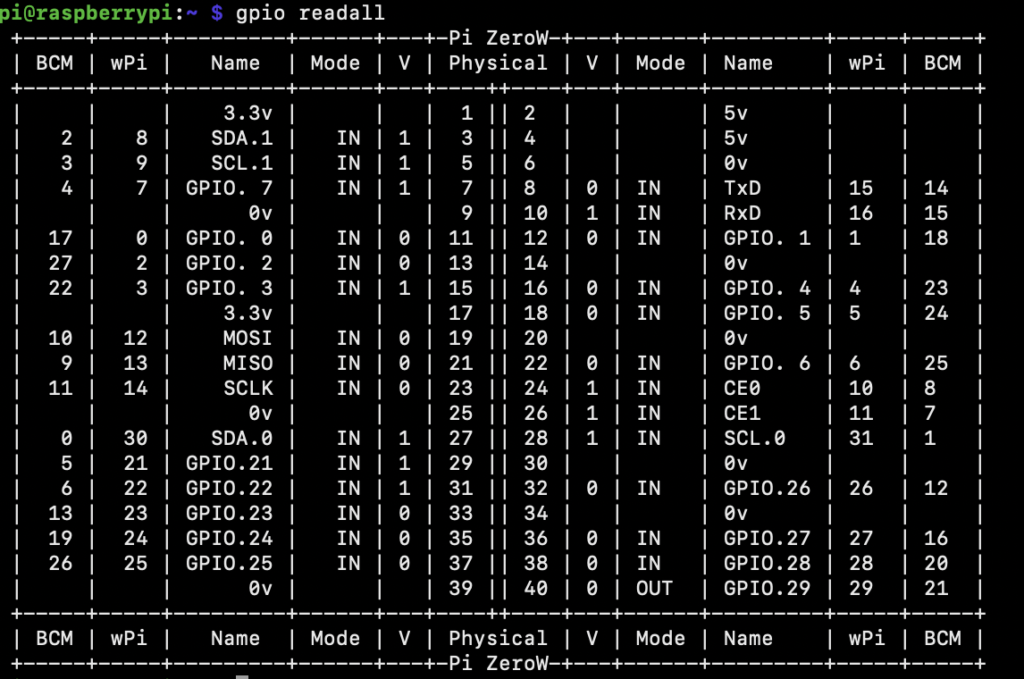
gpio readall

you should get something like this:

it shows every pin of your raspberry boards and

  1. the numbering of the pin
  2. the voltage (in case of voltage pin)
  3. if it’s in use (1) or not (0)
  4. set High or Low voltage for each pin through command line (for example gpio -g write 33 1 give voltage to pin number 33 gpio -g write 33 0, remove voltage to that pin number 33)

Save username and password in git

Lately I started to work on a new environment and the first thing has been to install git.

The second thing has been to clone a repository and finally I started to pull and push things.

But! Every time I pulled and pushed something a very nasty little window started bothering me: insert username, insert password (because of course the repository was protected by a password)

And if initially I endured it, after the third time I started to hate it.

So…I decided to save locally my git username and password.

First I had to type this

git config --global credential.helper store

and then

git pull (or push)

You will be prompt (for the LAST TIME) the git username and password

They will be stored in a .git-credentials file in a clear format like:

https://username:password@repository

Normally this file is saved in your local [username] folder (in windows or linux OS)

There is the possibility to have a secure (and recommended) method using a ssh key. Alternatively you can use a caching timeout way of saving your credentials (just in memory for a limited period of time).

For a complete documentation please refer to:

https://git-scm.com/docs/git-credential-store

https://git-scm.com/book/en/v2/Git-Tools-Credential-Storage

Major.Minor.Patch


Every time you release a public (API) software you must update his version number.

The (public) version is universally composed by 3 numbers separated by a point:

Each version number has a semantic representation

The pattern is 

Major.Minor.Patch

Ex: in version number 10.2.5

10 is the Major version

2 is the Minor version

5 is the Patch version

All of these 3 numbers are always 

Incremented

NEVER decremented

Positive starting by 0

Patch number

It is incremented each time the release is about fixing some bug without affecting the already existing public interface

So if you see a version number like: 1.1.5 it means the last 5 releases were about fix bugs.

Minor number

As opposed to Patch, Minor means that they have been released new (interesting) public feature, without impacting old ones.

When there is a new Minor release the Patch number is restarted to 0. Of course, together to new feature, it’s possible that also some bug fixes have been released (even though the Patch number is 0)

Major Number

When the Major number is incremented the release contains new (fantastic) features, buuuut it means that all the old features are not anymore compatible! So if you depend on those, pay attention.

If you think about it, these versioning rules could be applied also to humans.

Each 1st of January we always have new proposals for our self, so it’s like we “would” change our Major version. Or whenever we learn something new we could upgrade our Minor version.

But when do we change our Patch Number? Maybe each time we have makeup?

toString() to JSON with Eclipse

right click –> Source –> generate toString() –> Generated code fieldset –> Edit button –> New.. button –> give a name (ex. JSON) –> copy and paste this pattern:

{"${member.name()}":"${member.value}", "${otherMembers}"}

That’s it.

Hope this help!

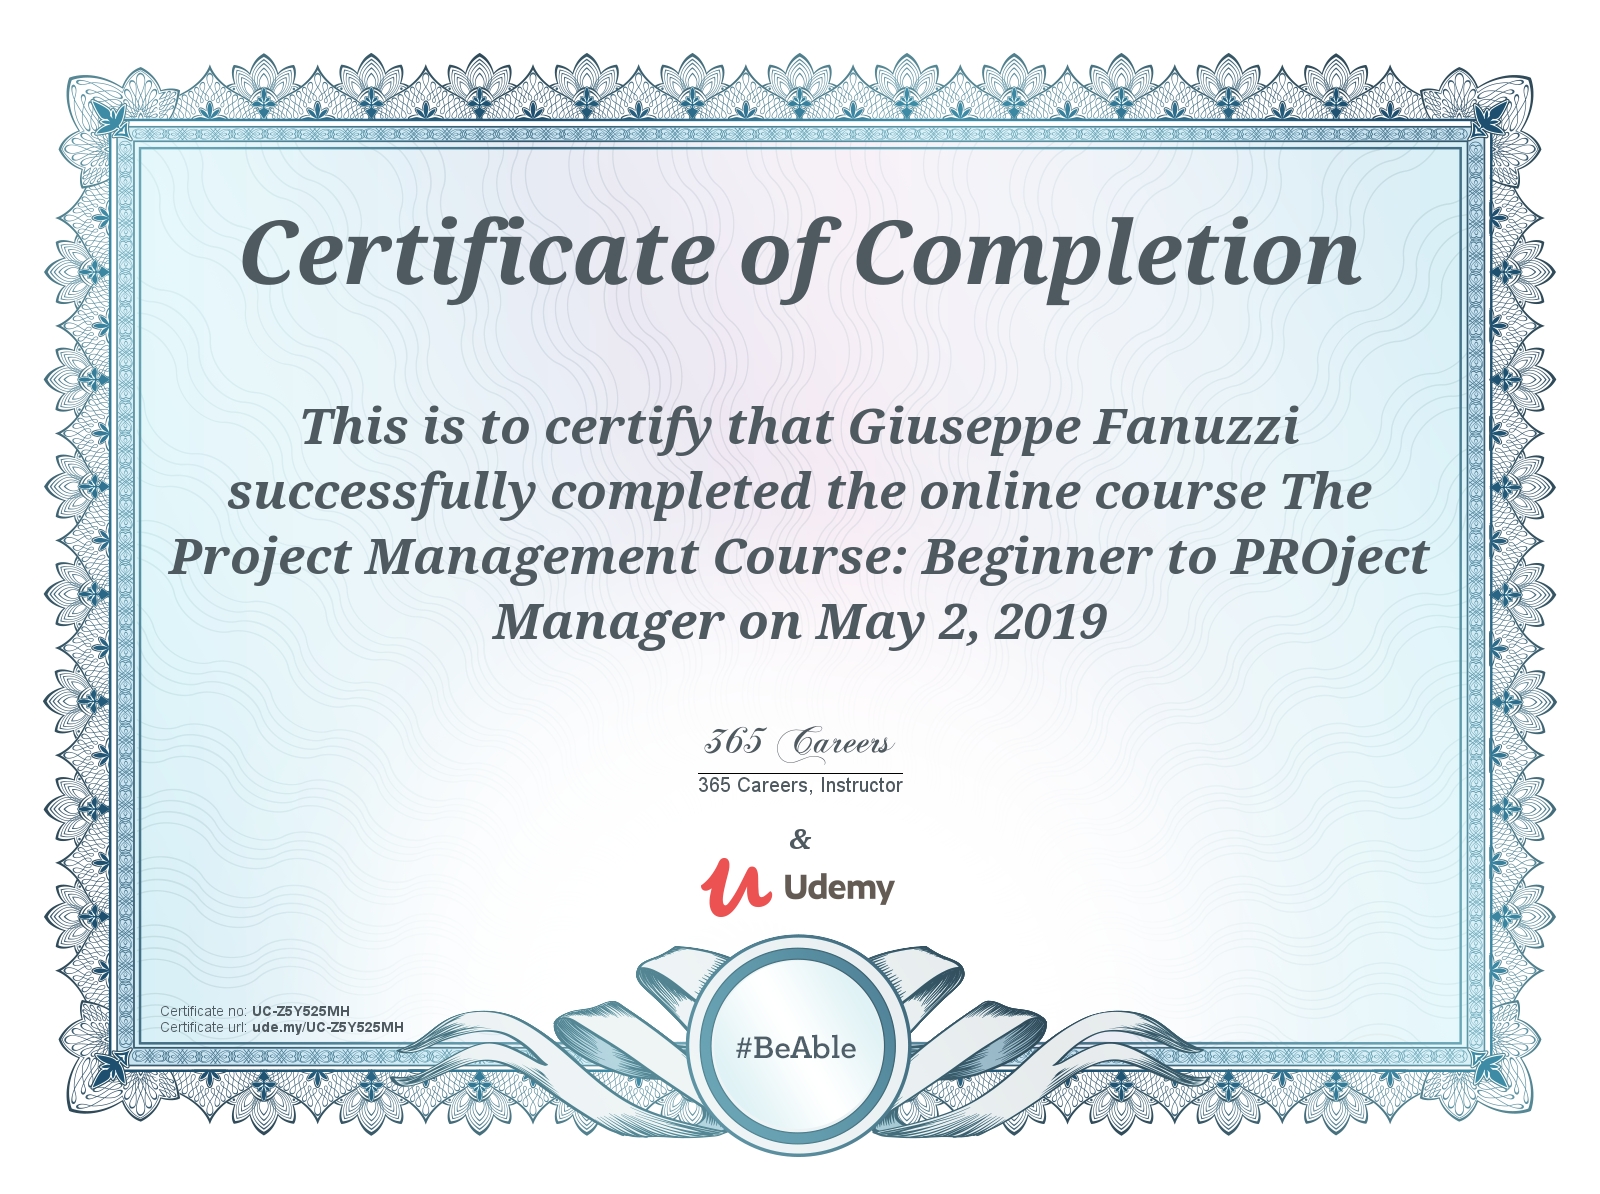
The Project Management Course: Beginner to PROject Manager

Course to acquire the business acumen to:

  • Manage a project on your own
  • Understand how to structure projects in large, medium, and small organizations
  • Become a project manager
  • Get promoted and apply what you learn here to the real business world
  • Gain an all-around view of why some projects succeed and why others do not

What I learned:

  • Learn the fundamental theory and best practices of project management
  • Perform an entire project from the beginning until its end, observing real-life scenarios and using practical PM templates!
  • Understand the project manager role and acquire the skills needed to become a successful project manager
  • Study Agile project management, performed with Scrum
  • Learn how to initiate, plan, execute, control, and complete a project
  • Develop the skills to manage an entire project on your own