Popular Python Libraries for Machine Learning

In the exciting world of Artificial Intelligence, having the right tools is crucial. In this lesson, we’ll explore three of the most popular Python libraries for machine learning: TensorFlow, PyTorch, and Keras.

TensorFlow

  • What is TensorFlow? TensorFlow is an open-source machine learning library developed by Google Brain. It’s used for a wide range of machine learning and deep learning tasks, including neural networks, natural language processing, and image recognition.
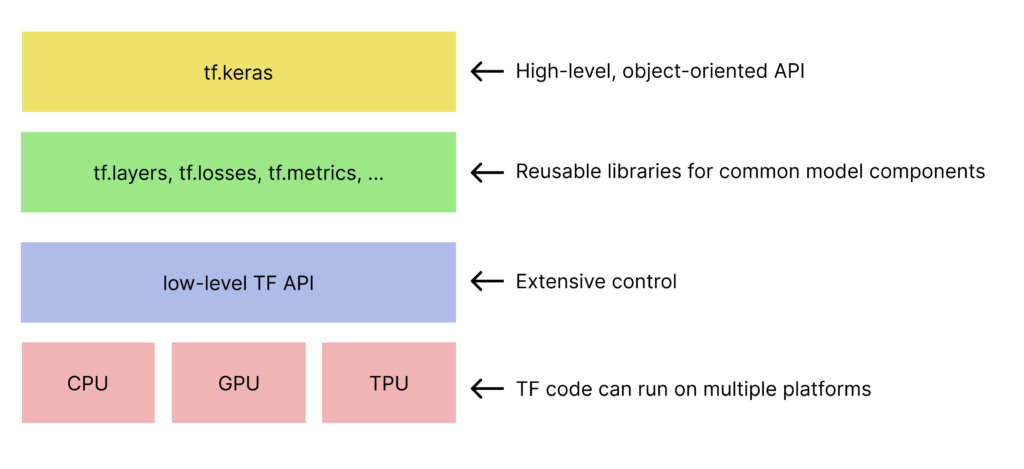
    • Tensorflow architecture is basically a multilayer APIs, where each top layer relies on the direct bottom layer
  • Why is it Popular? TensorFlow is renowned for its flexibility and scalability. It’s highly preferred for building and training deep learning models.
  • Who Uses It? Google, Uber, and Airbnb are just a few of the big names using TensorFlow for various AI applications. Learn more about TensorFlow.
PyTorch

  • What is PyTorch? PyTorch is an open-source machine learning library developed by Facebook’s AI Research lab (FAIR). It’s known for its dynamic computation graph, which is great for research and prototyping.
  • Why is it Popular? Researchers and academics favor PyTorch for its user-friendly interface and dynamic computation capabilities.
  • Who Uses It? Facebook, Twitter, and NVIDIA are among the organizations harnessing PyTorch’s power. Learn more about PyTorch.

Keras

  • What is Keras? Keras is an open-source neural networks API written in Python. It serves as an interface for TensorFlow, Theano, and Microsoft Cognitive Toolkit (CNTK). Keras makes it simpler to build and experiment with deep learning models.
  • Why is it Popular? Keras is renowned for its ease of use, making it an excellent choice for beginners. It also allows for seamless integration with TensorFlow.
  • Who Uses It? Keras is widely used across various industries, thanks to its user-friendly approach. It’s a favorite for many startups and researchers. Learn more about Keras.

Choosing the Right Library

Selecting the best library depends on your specific project and goals. TensorFlow is great for large-scale applications, while PyTorch is fantastic for research and experimentation. Keras, with its simplicity and integration options, is often the choice for quick prototyping.

In summary, these libraries are the driving force behind many AI applications. Whether you’re diving into deep learning, conducting research, or building AI-powered products, having these tools in your arsenal will be a game-changer.


Quiz Time:

  1. What is TensorFlow primarily developed by?
    • A) Facebook
    • B) Google
    • C) Microsoft
    • D) Twitter
  2. Which library is renowned for its dynamic computation graph?
    • A) TensorFlow
    • B) Keras
    • C) PyTorch
    • D) Theano
  3. Which library serves as an interface for TensorFlow, Theano, and CNTK?
    • A) TensorFlow
    • B) Keras
    • C) PyTorch
    • D) Scikit-learn
  4. What makes Keras popular among beginners and for quick prototyping?
    • A) Dynamic computation graph
    • B) Ease of use
    • C) Integration with PyTorch
    • D) Complex syntax

Correct Answers:

  1. B) Google
  2. C) PyTorch
  3. B) Keras
  4. B) Ease of use

Communicating Business Needs in Agile and Lean Environments

In today’s fast-paced business world, the ability to effectively communicate and respond to changing business needs is crucial. Traditional methods often fall short in this regard, which is where Agile and Lean methodologies come into play. In this post, we’ll explore the fundamentals of communicating business needs in Agile and Lean environments.

Understanding Lean and Agile: The Basics

Lean and Agile are two methodologies that have revolutionized the way businesses operate. Lean thinking revolves around the principles of delivering value, optimizing workflow, pulling work based on customer demand, and striving for perfection. On the other hand, Agile emphasizes iterative and collaborative approaches that are highly responsive to change.

Why Traditional Methods Fall Short

Before delving deeper into Agile and Lean, it’s essential to recognize the limitations of traditional business communication. The “waterfall” approach, where tasks are completed sequentially, often results in delayed responses to changing business needs. This rigid structure can hinder a company’s ability to stay competitive and meet customer expectations.

With traditional method we talk about:

Business requirements => Stakeholder requirements => Solution requirements

Lean Thinking: Delivering Value Efficiently

Lean thinking challenges businesses to identify and eliminate non-value-adding activities while optimizing processes to deliver value efficiently. In this context, effectively communicating business needs means focusing on what truly matters to customers and stakeholders. Lean encourages a constant evaluation of these needs to ensure that resources are allocated wisely.

Agile Methodology: Iteration and Collaboration

Agile, with its iterative and collaborative approach, fosters an environment where businesses can quickly respond to evolving requirements. It promotes regular interactions with stakeholders and encourages adaptability. This makes Agile a highly effective framework for communicating business needs. The key is to have a shared understanding of these needs among team members and stakeholders.

Effective Communication: The Key to Success

Regardless of the methodology used, effective communication is the key of success in Lean and Agile environments. It’s not just about transmitting information but also about receiving feedback and making continuous improvements. Business needs can evolve rapidly, and the ability to adapt is essential.

In the Lean/Agile world we talk about:

  • Features (low level functions, something that is observable, provable)
  • user stories, like stakeholders requirements. They represents the starting point to understand which features implement
  • Business rules,statements that express how the organizations what to function.
  • Constraints, externally imposed limit to what an application can or can’t do
  • Examples
  • use cases (interactions between users and application)
  • Test scenario

As you can see, Agile and Lean methodologies offer innovative approaches to business communication. By understanding and applying these concepts, you can streamline processes, improve customer satisfaction, and ultimately gain a competitive edge. Whether you’re a seasoned professional or just starting your journey, learning to communicate business needs in Lean and Agile environments is a skill that can transform the way you work.

The OSI Model

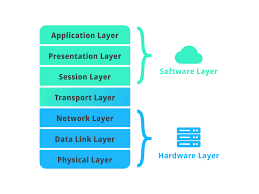
The OSI (Open System Interconnection) model is like a recipe for how computers communicate. It’s divided into 7 layers, each with its own job, from sending data to making sure it’s delivered correctly. Imagine it as a delicious cake with layers, where each layer has a specific role in making the cake perfect. The OSI model helps computers work together, just like the layers of a cake work together to make it tasty and complete.

From bottom to top:

  1. Physical Layer (Layer 1): This is like the foundation of a building. It deals with the actual wires, cables, and hardware, and how bits of data are turned into electrical signals for sending over the network.
  2. Data Link Layer (Layer 2): Think of this as the structure of a building. It manages how data is organized into frames and sent between devices on the same network, like your home’s Wi-Fi. MAC address is here very important
  3. Network Layer (Layer 3): This is like the road system that connects different buildings. It deals with routing data between different networks and uses IP addresses to make sure data gets to the right place. This layer ensure that each segment will reach the correct IP. Thanks to routers (and IP) that choose the best path 😉
  4. Transport Layer (Layer 4): Imagine this as the mailroom in a big office building. It ensures that data is sent reliably and in the right order. It also handles error-checking. TCP and UDP will ensure this. Segmentation (data is segmented/splitted into little segments, each segment has the port number to identify the correct application to send to this data, and it has also the sequence number in order to rebuild the data correctly). Flow control to control to amount of data to transfer.
  5. Session Layer (Layer 5): Think of this as a friendly conversation between two people. It establishes, maintains, synchronises, and ends connections between devices. In this case between the client and the server: session management, authentication and authorization
  6. Presentation Layer (Layer 6): This layer is like a translator. It makes sure that the data sent by one device can be understood by another by handling data encryption/decryption and compression. Basically ASCII data is translated into binary format, and then compressed in order to have faster communication, and then encrypted (https).
  7. Application Layer (Layer 7): This is the (network) software you use, like web browsers or email clients, or Skype, or FTP software, … It provides the interface for you to interact with the network. These applications are “network application”, basically all applications that use network.

Each layer has its own specific job, and they work together like a team to ensure data is sent, received, and understood correctly across a network.

A Beginner’s Guide to IT Jargon

In today’s digital world, understanding the basics of IT and networking is crucial. It’s essential to grasp fundamental terms and concepts. This article aims to simplify and explain key networking terms to help you navigate the world of technology effectively.

Host

A host is any device connected to a network, such as a computer, smartphone, or server. It uses unique identifiers like IP addresses to communicate with other devices on the network.

Link

A link is the physical or logical connection between two devices within a network, typically established using cables or wireless connections. It enables data transmission between devices.

Gateway

A gateway is a device that connects different networks, serving as a bridge between them. It directs data traffic between the local network and external networks, like the internet.

Wi-Fi

Wi-Fi is a wireless technology that allows devices to connect to a network without using physical cables. It is widely used for internet access and networking in homes, schools, and businesses.

Endpoint

An endpoint is a device or software application that communicates with a network. Endpoints can be computers, smartphones, or IoT devices, and they are vital for network access and data exchange.

VPN (Virtual Private Network)

A VPN is a secure network connection that encrypts data transmitted between your device and a remote server, ensuring privacy and security. It is often used to protect online communication and access restricted content.

Switch

A switch is a networking device that connects multiple devices within a local network. It efficiently directs data packets to their intended destinations, improving network performance.

UTM (Unified Threat Management)

UTM is a comprehensive security solution that combines multiple security features like firewall, antivirus, intrusion detection, and more into one device or software to protect a network from various threats.

NAT (Network Address Translation)

NAT is a technique used to map multiple private IP addresses to a single public IP address. It helps conserve IPv4 addresses and enables multiple devices to share a single public IP.

DHCP (Dynamic Host Configuration Protocol)

DHCP is a network protocol that assigns IP addresses and network configuration settings dynamically to devices when they connect to a network. It simplifies network administration.

MAC Address

A MAC (Media Access Control) address is a unique identifier assigned to network devices at the hardware level. It is used to distinguish devices on a local network.

TCP/IP (Transmission Control Protocol/Internet Protocol)

TCP/IP is a set of protocols that govern data transmission over the internet and most computer networks. It defines how data is addressed, transmitted, and received across networks.

Protocol

A protocol is a set of rules and standards that govern communication between devices on a network. It ensures data is transmitted consistently and reliably.

IP (Internet Protocol)

IP is a set of rules and addressing conventions that enables data packets to be routed and delivered on the internet. IPv4 and IPv6 are two common IP versions.

Subnet

A subnet is a division of a larger network into smaller, more manageable segments. Subnetting helps optimise network performance and organisation.

Network Class

Network class refers to a classification system for IP addresses based on their range and usage. Classes include A, B, C, D, and E, with each serving a different purpose and accommodating a specific number of devices.

Understanding these essential networking terms is a great first step in mastering the world of IT. As you continue to explore this fascinating field, these definitions will serve as a foundation for your knowledge and skills. Whether you’re setting up a home network, troubleshooting connectivity issues, or pursuing a career in IT, these terms will be invaluable in your journey.

Cryptography in Cybersecurity: A Closer Look at HashCalc, VeraCrypt, Hash Cracking, and BCTextEncoder

Cryptography is an essential component of cybersecurity, providing a secure way to protect sensitive information from unauthorised access. It involves the use of mathematical algorithms to encrypt data, rendering it unintelligible to anyone without the appropriate decryption key. In this post, we’ll explore various aspects of cryptography and delve into the tools and techniques associated with it.

HashCalc: A Valuable Tool in Cryptography

HashCalc is a versatile cryptographic tool used for calculating and verifying file hashes.

A hash is a fixed-length string of characters generated by applying a hashing algorithm to

Imagine you have a box of crayons with different colors. You want to create a code for each color, so that you can easily identify them without looking at the box. One way to do this is to use the first letter of each color as the code. For example, the code for red would be R, the code for blue would be B, the code for green would be G, and so on. This is a simple hash function that takes a color as an input and produces a letter as an output.

However, this hash function has a problem: what if you have two colors that start with the same letter? For example, you have both orange and olive in your box. How would you distinguish them with just one letter? You need a better hash function that can avoid this problem. One possible solution is to use the first two letters of each color as the code. For example, the code for orange would be OR, the code for olive would be OL, the code for purple would be PU, and so on. This hash function is more complex than the previous one, but it can produce more unique codes for different colors.

You can also try to make your own hash function by using different rules or patterns to create codes for colors. For example, you can use the number of letters in each color as the code. The code for red would be 3, the code for blue would be 4, the code for green would be 5, and so on. Or you can use the last letter of each color as the code. The code for red would be D, the code for blue would be E, the code for green would be N, and so on. There are many possible ways to create hash functions, but some are better than others depending on what you want to use them for.

It serves several purposes, such as ensuring data integrity and verifying the authenticity of files. Here are a few key features of HashCalc:

  1. Hash Generation: HashCalc can calculate various hash values (MD5, SHA-1, SHA-256, etc.) for files, allowing you to verify their integrity.
  2. File Verification: You can use HashCalc to check whether a file matches a known hash value, ensuring the file hasn’t been tampered with.
  3. Simple Interface: HashCalc typically offers a user-friendly interface, making it accessible to both beginners and experts in the field.

VeraCrypt: Secure Your Data with Encryption

VeraCrypt is an open-source disk encryption software that can protect your data with strong encryption. It builds on the foundation of TrueCrypt and provides numerous security features:

  1. Full Disk Encryption: VeraCrypt can encrypt entire disks, including the operating system, ensuring data remains secure even if a device is lost or stolen.
  2. On-the-fly Encryption: It seamlessly encrypts and decrypts data as it’s read and written, providing real-time protection without significant performance degradation.
  3. Hidden Volumes: VeraCrypt lets you create hidden volumes within encrypted partitions, adding an extra layer of security.
  4. Cross-Platform: VeraCrypt is available for Windows, macOS, and Linux, making it versatile and accessible to a wide range of users.

How to Crack Hashes

While cryptography is used to secure data, it’s important to understand that no encryption is completely unbreakable. To enhance cybersecurity, it’s essential to be aware of hash cracking techniques used by attackers:

  1. Brute Force: Attackers systematically try all possible combinations until the correct hash is found. Strong and complex passwords are essential to resist this method.
  2. Dictionary Attacks: Attackers use lists of common words and phrases to guess passwords. Using unique, non-dictionary-based passwords can mitigate this risk.
  3. Rainbow Tables: Attackers use precomputed tables to quickly reverse hashes. Salting passwords (adding a unique value before hashing) can prevent this attack.
  4. GPU Acceleration: Attackers can leverage the parallel processing power of graphics cards to speed up hash cracking. Properly salting and using strong passwords help defend against this.

BCTextEncoder: Securely Encode Text

BCTextEncoder is a powerful tool for securely encoding and decoding text messages using various cryptographic algorithms. It’s ideal for keeping sensitive information private during communication. Here are its main features:

  1. Various Algorithms: BCTextEncoder supports multiple encoding methods, including Base64, Hex, and URL encoding.
  2. Security: It uses robust encryption techniques to ensure your encoded messages are safe from eavesdroppers.
  3. Cross-Platform: BCTextEncoder is available for Windows, macOS, and Linux, making it suitable for a wide range of users.

In conclusion, cryptography plays a vital role in the realm of cybersecurity, safeguarding data and communications from unauthorized access. Tools like HashCalc, VeraCrypt, BCTextEncoder, and an understanding of hash cracking techniques are crucial for protecting your digital assets and information. By using these tools and adopting best practices, you can bolster your cybersecurity defenses and keep sensitive data out of the wrong hands.

How to Handle and Resolve Conflicts in Git

In this post, we’re going to tackle a common roadblock in Git: conflicts. Don’t worry; I’ll make this as simple as buttered toast!

Understand What Conflicts Are and Why They Occur

Conflicts, in Git, happen when two people make changes to the same part of a file in two different branches.

Imagine it like this: you and your friend both try to decorate the same cake with different toppings at the same time. Conflict time!

Why Conflicts Occur:

  1. Parallel Universe Syndrome: When multiple people are working on the same project, it’s like everyone’s cooking in their own kitchen. Sometimes, you both reach for the salt shaker at the same time.
  2. No Mind Reading: Git doesn’t have mind-reading superpowers. It doesn’t know whose topping should go on the cake. So, it’s like, “Hold up, I need help deciding.”

Learn How to Resolve Conflicts When Merging Branches

Resolving Conflicts is all about making that cake look beautiful again after at least two people mixed up stuff over it, and Git gives you the tools.

Just follow these steps.

  1. Identify the Conflict: Git tells you which files have conflicts. Open those files in a text editor.
  2. Find the Conflict Markers: Look for lines like <<<<<<<, =======, and >>>>>>>. They show where the conflict starts and ends.
  3. Make a Decision: Decide which topping to keep or how to combine them.
  4. Remove Conflict Markers: Delete the markers and unwanted code.
  5. Save the File: Save your changes in the text editor.
  6. Add and Commit: After resolving conflicts, add the file and commit it.

That’s it! You’ve just solved a Git conflict like a pro baker!

Remember, conflicts are just part of the collaborative coding journey, and learning to resolve them is a crucial skill.


Questions:

Question 1: What are conflicts in Git?

a) Friendly disagreements between developers.
b) Events where Git refuses to work.
c) Issues that occur when two people edit the same part of a file in different branches.
d) Errors that happen when Git runs out of memory.

Question 2: Why do conflicts occur in Git?

a) Because Git loves drama.
b) Because two people can edit the same part of a file in different branches.
c) Because Git doesn't like your code.
d) Because conflicts are random and unpredictable.

Question 3: When you encounter a conflict, what do you need to do first?

a) Panic and close your computer.
b) Shout at Git for causing the conflict.
c) Identify the conflict and open the affected file.
d) Automatically choose your code over others'.

Question 4: What do the conflict markers <<<<<<<, =======, and >>>>>>> indicate in a conflicted file?

a) They indicate your best friend's code.
b) They're just random symbols.
c) They show the start and end of the conflict and the dividing line between conflicting code.
d) They are secret Git codes.

Question 5: After resolving a conflict, what should you do next in Git?

a) Make a new conflict.
b) Ignore the changes.
c) Add the file, commit the changes, and carry on coding.
d) Uninstall Git.

1c – 2b – 3c – 4c – 5c

Mastering Cyber Kill Chain: Defending Against Cyber Threats

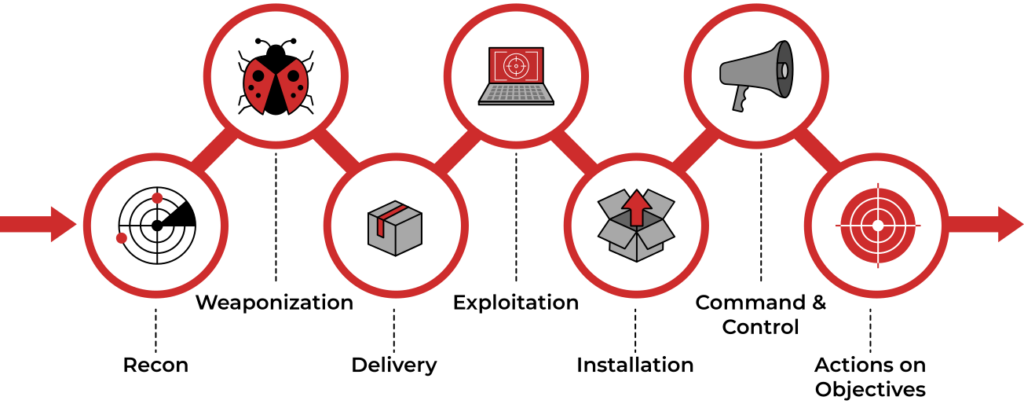
The cyber kill chain is a concept used in cybersecurity to describe the stages of a cyberattack, from the initial reconnaissance to the final objective. Understanding the cyber kill chain is essential for both cybersecurity specialists as it provides a structured way to analyse and defend against potential threats. Let’s break these stages down.

What is the Cyber Kill Chain?

The cyber kill chain is a framework that outlines the various stages an attacker goes through in planning and executing a cyberattack. It was originally developed by Lockheed Martin and has since become a widely accepted model for analysing and defending against cyber threats.

The Stages of the Cyber Kill Chain

  1. Reconnaissance: In this initial phase, the attacker gathers information about the target, such as identifying vulnerabilities, potential entry points, and weaknesses in the target’s security posture. This can involve passive information gathering, like scanning publicly available data or conducting open-source intelligence (OSINT) research.
  2. Weaponization: During this stage, the attacker creates or acquires the malicious tools or exploits needed for the attack. This can include crafting malware, developing phishing emails, or preparing malicious payloads.
  3. Delivery: The attacker delivers the weaponized content to the target, often through various means like email attachments, infected websites, or other vectors. The goal is to get the malicious content onto the target’s system.
  4. Exploitation: At this point, the attacker exploits vulnerabilities in the target’s system to gain access. This could involve using software vulnerabilities, exploiting misconfigurations, or social engineering to trick users into opening malicious files.
  5. Installation: The attacker establishes a foothold within the target’s environment by installing backdoors, remote access tools, or other malware. This ensures persistent access for future stages of the attack.
  6. Command and Control (C2): Once inside the target’s network, the attacker establishes communication channels with the compromised system(s). This allows them to control and manage their illicit activities while avoiding detection.
  7. Actions on Objectives: The final stage involves the attacker achieving their primary goal, which could be data theft, system compromise, or other malicious objectives. This is often where the most damage is done.

Why is the Cyber Kill Chain Important?

Understanding the cyber kill chain is crucial for cybersecurity specialists because it provides a structured way to analyse and defend against threats. By identifying and disrupting the attack chain at an early stage, security professionals can prevent cyberattacks from reaching their ultimate objectives. It’s a proactive approach to cybersecurity that helps in designing effective security strategies and incident response plans.


Question 1: What is the primary purpose of the Cyber Kill Chain framework?

a) To facilitate cyberattacks
b) To analyze and defend against cyber threats
c) To automate network security
d) To create malware payloads

Question 2: At which stage of the Cyber Kill Chain does an attacker gather information about the target, such as vulnerabilities and weaknesses?

a) Weaponization
b) Exploitation
c) Reconnaissance
d) Command and Control (C2)

Question 3: In the context of the Cyber Kill Chain, what is the “Delivery” stage primarily focused on?

a) Controlling compromised systems
b) Establishing communication channels
c) Gaining access through exploitation
d) Getting malicious content to the target

Question 4: What is the final objective of an attacker in the Cyber Kill Chain framework?

a) Establish communication channels
b) Install malware on the target system
c) Achieve the primary malicious goal
d) Gather information about the target

Question 5: How does understanding the Cyber Kill Chain benefit cybersecurity professionals?

a) It allows them to automate cyberattacks
b) It provides a structured way to analyze and defend against threats
c) It helps create stronger malware payloads
d) It facilitates open communication with attackers

1b – 2c – 3d – 4c – 5b

Digital Guardian: “John” the Ethical Shield

“John the Ripper” is a well-known password cracking tool used in the field of cybersecurity. It’s not only used by security professionals but also by ethical hackers to test the strength of passwords and identify weak passwords in various systems. In this article, I will explain what John the Ripper is, how it works, and its ethical applications in cybersecurity.

Understanding John the Ripper:

John the Ripper, often abbreviated as “John,” is an open-source password cracking software originally developed for Unix-based systems. It’s designed to find weak passwords through various techniques, including dictionary attacks, brute-force attacks, and more. The tool is widely used for assessing the security of passwords and identifying vulnerabilities in systems.

Key Features and Techniques:

  1. Dictionary Attacks: John the Ripper uses pre-compiled password dictionaries containing commonly used passwords, words, and character patterns. It tries each entry in the dictionary to match against the target password. This is an efficient way to crack passwords, as it focuses on commonly used combinations.
  2. Brute-Force Attacks: In brute-force attacks, John the Ripper systematically generates and tests all possible password combinations. This is a time-consuming process but can eventually crack even the most complex passwords.
  3. Hybrid Attacks: John also supports hybrid attacks, which combine dictionary words with various character transformations and substitutions. This makes it more effective at cracking passwords that include a mix of dictionary words and symbols.
  4. Rule-Based Attacks: Users can create custom rules for password cracking, specifying how the software should manipulate and test passwords. These rules can be highly effective in targeting specific password patterns.

Ethical Use of John the Ripper:

It’s important to note that John the Ripper should only be used in ethical and legal contexts, such as:

  1. Penetration Testing: Security professionals use John the Ripper to test the strength of passwords on their own systems or systems they are authorized to assess. This helps identify weak passwords and improve overall security.
  2. Password Recovery: John can be used to recover lost or forgotten passwords for legitimate reasons, such as forgotten encryption keys or password-protected files.
  3. Educational Purposes: John the Ripper is an essential tool for cybersecurity education. Students learn how to protect systems by understanding how attackers might exploit weak passwords.

Best Practices for Using John the Ripper Ethically

  1. Always obtain proper authorization before attempting to crack passwords on a system.
  2. Use the tool only on systems or accounts you own or have explicit permission to assess.
  3. Do not use John the Ripper for any illegal or malicious activities, including unauthorized intrusion or data theft.
  4. Employ strong ethical standards when using the tool and respect privacy and legal boundaries.

When used ethically and responsibly, it plays a crucial role in enhancing overall cybersecurity.


Question 1: What is the primary purpose of John the Ripper?

a) To infiltrate systems and steal data
b) To conduct brute-force attacks on systems
c) To recover lost encryption keys
d) To conduct dictionary attacks on secure websites

Question 2: Which of the following is a technique used by John the Ripper to crack passwords by trying all possible combinations?

a) Dictionary Attack
b) Rule-Based Attack
c) Brute-Force Attack
d) Hybrid Attack

Question 3: In ethical cybersecurity, under what circumstances should you use John the Ripper?

a) To test the strength of passwords on your own systems or systems you have permission to assess
b) To crack passwords on any system without authorization
c) To recover lost passwords for personal use
d) To launch malicious attacks on any target system

Question 4: What is a dictionary attack in the context of John the Ripper?

a) An attack that targets specific individuals
b) An attack that uses custom rules for password cracking
c) An attack that tests all possible password combinations
d) An attack that uses a list of commonly used passwords

Question 5: How can custom rules be useful when using John the Ripper?

a) They allow the tool to perform illegal activities
b) They can help target specific password patterns
c) They are used to bypass authentication systems
d) They automatically decrypt encrypted files

1b – 2c – 3a – 4d – 5b

Deep Learning and Neural Networks – Let’s Dive In!

Today, we’re going to unveil the fascinating world of deep learning and how it supercharges our neural networks.

Define Deep Learning and Its Relationship to Neural Networks

Alright, picture this: neural networks are like the engines of AI, and deep learning is the fuel that makes them roar! 🚗💨

  • Deep Learning: It’s a subset of machine learning where we stack multiple neural networks on top of each other. Deep learning is all about going deep (hence the name) and extracting intricate patterns from data.
  • Neural Networks: These are the brains of our AI operations. They’re designed to mimic our own brain’s structure, with layers of interconnected ‘neurons.’ Each layer processes data in its unique way, leading to more complex understanding as we go deeper.

For a deeper dive into deep learning, you can check out the official Deep Learning Guide by TensorFlow.

Learn Why Deep Neural Networks Are Powerful for Complex Tasks

Imagine your smartphone evolving from a simple calculator to a full-fledged gaming console. That’s what happens when we make neural networks deep! 📱🎮

  • Powerful for Complex Tasks: Deep neural networks can tackle super tough problems. They recognize objects in images, understand human speech, and even beat world champions at board games. 🎉🏆
  • Hierarchical Learning: Each layer in a deep network learns a different level of abstraction. The early layers spot basic features, like edges, while the deeper layers understand complex combinations of these features. It’s like learning to draw lines before creating masterpieces!

To see some real-world applications of deep learning, visit the Deep Learning Examples on the official PyTorch website.


Now, let’s put your newfound knowledge to the test with these questions:

Question 1: What is the relationship between deep learning and neural networks?

A) Deep learning is a type of neural network.
B) Deep learning fuels neural networks.
C) Deep learning stacks multiple neural networks.
D) Deep learning and neural networks are unrelated.

Question 2: How do deep neural networks handle complex tasks compared to shallow networks?

A) They perform worse on complex tasks.
B) They process data in a more basic way.
C) They can recognize intricate patterns and solve complex problems.
D) They require less training.

Question 3: What does each layer in a deep neural network learn as we go deeper?

A) The same information at different scales.
B) Complex patterns and combinations of features.
C) Nothing, they’re just placeholders.
D) Basic features like edges and colors.

Question 4: What’s an example of a complex task that deep neural networks excel at?

A) Simple arithmetic calculations.
B) Recognizing objects in images.
C) Identifying primary colors.
D) Writing poetry.

Question 5: What’s the primary benefit of using deep neural networks for complex tasks?

A) They require less computational power.
B) They process data faster.
C) They can understand intricate patterns.
D) They make AI less powerful.

1C – 2C – 3B – 4B – 5C

Teamwork Made Easy: Using Git for Collaborative Development

In this lesson, we’ll dive into the world of collaborative development using Git. We’ll explore remote repositories and learn how to clone, push, and pull changes to and from them.

Introduce the Concept of Remote Repositories

A remote repository is a Git repository hosted on a server, typically on the internet or a network. It allows multiple developers to collaborate on a project by sharing their changes with one another. Here’s why remote repositories are crucial:

  • Collaboration: Developers working on the same project can access and contribute to the codebase from different locations.
  • Backup: Remote repositories serve as a backup, protecting your project’s history from data loss.
  • Version Control: They provide a central location for tracking changes made by different team members.

Clone a Repository from a Remote Source

Cloning a Repository (git clone):

  • To clone a remote repository to your local machine, use the git clone command, followed by the repository’s URL:
git clone https://github.com/username/repo.git
  • This command creates a local copy of the remote repository, allowing you to work on it and collaborate with others.

Push and Pull Changes from/to Remote Repositories

Pushing Changes to a Remote Repository (git push):

Once you’ve made local commits, you can push those changes to the remote repository:

git push origin branchname

This command sends your local commits to the remote repository.

Pulling Changes from a Remote Repository (git pull):

To retrieve changes made by others in the remote repository, use the git pull command:

git pull origin branchname

This command fetches and merges changes from the remote repository into your current branch.

Collaborative development with Git and remote repositories is an essential part of modern software development.


Questions:

Question 1: What is the primary purpose of remote repositories in Git?

a) To slow down development.
b) To serve as a personal backup of your code.
c) To enable collaboration and sharing of code among multiple developers.
d) To keep code secret and inaccessible to others.

Question 2: Which Git command is used to clone a remote repository to your local machine?

a) git copy
b) git create
c) git clone
d) git fetch

Question 3: What does the git push command do in Git?

a) Retrieves changes from a remote repository.
b) Deletes all commits from a branch.
c) Sends your local commits to a remote repository.
d) Creates a new branch in the remote repository.

Question 4: How do you fetch and merge changes from a remote repository into your local branch?

a) Use `git update`.
b) Use `git merge origin branchname`.
c) Use `git pull origin branchname`.
d) Use `git push origin branchname`.

Question 5: Why is collaborative development with remote repositories important in Git?

a) It helps developers work in isolation without sharing their code.
b) It ensures that only one person can work on the project at a time.
c) It allows multiple developers to collaborate and track changes effectively.
d) It prevents developers from making any changes to a project.

1C – 2C – 3C – 4C – 5C