DevOps in the Cloud

Hello! Today, we’ll delve into the dynamic realm of DevOps in the Cloud. Cloud computing and DevOps have become inseparable partners, offering unparalleled scalability, flexibility, and efficiency. This time we’ll explore the fundamentals, practices, and tools that make DevOps in the Cloud a game-changer.

Cloud Computing Fundamentals

What is Cloud Computing?

Cloud computing is the delivery of computing services over the internet, providing access to a pool of shared computing resources (servers, storage, databases, networking, software, etc.).

Cloud services are categorized into three main models: Infrastructure as a Service (IaaS), Platform as a Service (PaaS), and Software as a Service (SaaS).

Using Cloud Services (e.g., AWS, Azure) for DevOps

Cloud Providers

Leading cloud providers like Amazon Web Services (AWS) and Microsoft Azure offer a vast array of services that facilitate DevOps practices.

These services include cloud-based infrastructure, container orchestration (e.g., AWS ECS, Azure Kubernetes Service), serverless computing (e.g., AWS Lambda, Azure Functions), and more.

Scalability and Elasticity

Scalability refers to the ability to handle an increasing workload by adding resources, such as servers or processing power, to your infrastructure.

In the cloud, scalability can be achieved horizontally (adding more servers) or vertically (adding more resources to existing servers).

Elasticity builds on scalability by automatically adjusting resource allocation based on demand.

Cloud services can automatically scale resources up during traffic spikes and down during lulls, optimizing cost and performance.

Cloud-native DevOps Practices

Cloud-native DevOps practices leverage the advantages of cloud services and follow key principles like microservices architecture, continuous delivery, and containerization.

Container orchestration platforms like Kubernetes have become a cornerstone of cloud-native DevOps for managing and scaling containerized applications.


Now, let’s test your understanding with some questions:

  1. What is the main advantage of cloud computing in DevOps?
    a) Lower cost
    b) Increased complexity
    c) Scalability, flexibility, and efficiency
    d) Decreased automation
  2. Which of the following is not a cloud computing service model?
    a) IaaS (Infrastructure as a Service)
    b) PaaS (Platform as a Service)
    c) SaaS (Software as a Service)
    d) HaaS (Hardware as a Service)
  3. What is the primary benefit of elasticity in the cloud?
    a) It allows for horizontal scaling.
    b) It ensures data security.
    c) It automatically adjusts resource allocation based on demand.
    d) It eliminates the need for continuous delivery.
  4. Which cloud provider offers services like AWS Lambda and AWS ECS for serverless computing and container orchestration, respectively?
    a) Microsoft Azure
    b) Google Cloud Platform
    c) IBM Cloud
    d) Amazon Web Services (AWS)
  5. What are the key principles of cloud-native DevOps practices?
    a) Waterfall development, manual testing, and monolithic architecture
    b) Microservices architecture, continuous delivery, and containerization
    c) On-premises infrastructure, infrequent deployments, and single-tier applications
    d) Traditional project management, isolated development, and manual deployments

1 c – 2 d – 3 c – 4 d – 5 b

Security in DevOps

Hello! As we progress through our DevOps journey, we come to a critical aspect that should be ingrained in every step of the DevOps pipeline: Security. Today we’ll explore the fundamental principles, practices, and tools of DevSecOps—where “Sec” stands for security.

DevSecOps Principles

DevSecOps is an approach that integrates security practices into the DevOps pipeline. Instead of treating security as a separate phase, it’s woven into every stage, from development to deployment.

Security is everyone’s responsibility in a DevSecOps culture, not just the security team’s.

Shift Left:

  • The concept of “Shift Left” in DevSecOps emphasizes addressing security concerns early in the development process. This proactive approach reduces the chances of security vulnerabilities making it into production.
  • Security checks, code reviews, and automated security testing are performed as code is developed, not just before deployment.

Security Scanning and Vulnerability Management

Security Scanning

Security scanning tools are used to identify vulnerabilities in code, dependencies, and configurations. Examples include static analysis tools that analyze code for security issues and dynamic analysis tools that test applications during runtime.

Automated scans are integrated into the CI/CD pipeline to catch vulnerabilities early.

Vulnerability Management

Once vulnerabilities are identified, a vulnerability management process is put in place to prioritize, remediate, and track the resolution of issues.

Vulnerability databases like the Common Vulnerabilities and Exposures (CVE) list are used to keep track of known vulnerabilities.

Compliance as Code

Compliance requirements are translated into code, known as Compliance as Code, which is used to automate checks for compliance.

Continuous compliance checks are performed automatically as part of the deployment process.

Security Best Practices

  • Least Privilege: Users and systems should only have the minimum access and permissions required to perform their tasks.
  • Secure by Design: Security considerations should be part of the design phase, and security controls should be implemented from the beginning.
  • Patch Management: Keep software and systems up-to-date with the latest security patches.
  • Monitoring and Incident Response: Continuously monitor systems for security threats, and have a well-defined incident response plan in place.

Now, let’s test your understanding with some questions:

  1. What does “Shift Left” mean in the context of DevSecOps?
    a) Delaying security checks until deployment.
    b) Addressing security concerns early in the development process.
    c) Shifting security responsibilities to the operations team.
    d) Ignoring security concerns in favor of rapid development.
  2. Which type of security scanning tool analyzes code for security issues during development?
    a) Dynamic analysis tools
    b) Monitoring tools
    c) Compliance as Code tools
    d) Static analysis tools
  3. What is the purpose of Vulnerability Management in DevSecOps?
    a) To identify security issues early in development.
    b) To automate deployment.
    c) To prioritize, remediate, and track the resolution of vulnerabilities.
    d) To create compliance checks.
  4. What does “Compliance as Code” refer to in DevSecOps?
    a) A coding style that emphasizes compliance with coding standards.
    b) A way to automate checks for compliance requirements using code.
    c) A coding practice that ignores security concerns.
    d) A coding approach that focuses on rapid development.
  5. Which security best practice emphasizes providing users and systems with only the minimum access and permissions needed to perform their tasks?
    a) Secure by Design
    b) Least Privilege
    c) Patch Management
    d) Monitoring and Incident Response

1 b – 2 b – 3 c – 4 b – 5 b

How Neural Networks Learn – Let’s Dive In!

Hey there, future AI experts! 🚀

Today, we’re going to uncover the magical way in which neural networks learn from data.

It’s a bit like solving a challenging puzzle, but incredibly rewarding once you grasp it.

Introduce the Concept of Weights and Biases

Think of a neural network as a young chef, eager to create a perfect dish. To achieve culinary excellence, the chef needs to balance the importance of each ingredient and consider personal tastes.

  • Weights: These are like recipe instructions. They assign importance to each ingredient in the dish, guiding how much attention it should receive during cooking.
    Here’s a link to the official TensorFlow documentation on weights and losses.
  • Biases: Imagine biases as the chef’s personal preferences. They influence how much the chef leans towards certain flavors, even if the recipe suggests otherwise.
    For an in-depth look, check out this link to the official PyTorch documentation on biases.

Learn How Neural Networks Adjust Weights to Learn from Data

Our aspiring chef doesn’t achieve culinary brilliance right away; they learn through trial and error, just like perfecting a skateboard trick or acing a video game level.

  • Learning from Mistakes: When the chef’s dish turns out too bland or too spicy, they analyze which recipe notes (weights) need fine-tuning. It’s a process of continuous improvement.

Let’s try with another example.

Imagine you’re learning to play a video game, and you want to get better at it. To improve, you need to pay attention to your mistakes and make adjustments. Neural networks work in a similar way when learning from data.

  1. Initial Setup:
    • At the beginning, a neural network doesn’t know much about the task it’s supposed to perform. It’s like starting a new game without any knowledge of the rules.
  2. Making Predictions:
    • Just like you play the game and make moves, the neural network takes in data and makes predictions based on its initial understanding. These predictions might not be very accurate at first.
  3. Comparing to Reality:
    • After making predictions, the neural network compares them to the real correct answers. It’s similar to checking if the moves you made in the game matched what you should have done.
  4. Calculating Mistakes:
    • If the neural network’s prediction doesn’t match the correct answer, it calculates how far off it was. This difference is the “mistake” or “error.” It’s like realizing where you went wrong in the game.
  5. Adjusting Weights:
    • Now, here’s the cool part! The neural network figures out which parts of its “knowledge” (represented as weights) led to the mistake. It fine-tunes these weights, making them a little heavier or lighter. It’s similar to adjusting your game strategy to avoid making the same mistake again.
  6. Repeating the Process:
    • The neural network keeps doing this for many examples, just like you play the game multiple times to get better. With each round, it learns from its mistakes and becomes more accurate.
  7. Continuous Improvement:
    • Over time, the neural network becomes really good at the task, just like you become a pro at the game. It’s all about learning from experiences and fine-tuning its “knowledge” until it gets things right most of the time.

So, in a nutshell, neural networks learn by making predictions, comparing them to reality, calculating mistakes, and adjusting their “knowledge” (weights) to get better and better at their tasks. It’s like leveling up in a game, but instead of gaining experience points, the neural network gains knowledge.

Understand the Importance of Training and Optimization

Going back to our chef, becoming a top chef requires dedication and practice. The same applies to neural networks.

  • Training: Think of it as the chef practicing their dish repeatedly, tweaking the ingredients and techniques until they achieve perfection.
    This link to the official Keras documentation provides insights into training neural networks.
  • Optimization: This is like refining the cooking process – finding the ideal cooking time, temperature, and seasoning to create the perfect dish. It’s all about efficiency and quality.
    For a comprehensive understanding, explore this link to the official TensorFlow documentation on optimization.

Questions

Now, let’s check your understanding with some thought-provoking questions:

Question 1: What purpose do weights serve in a neural network?

A) They determine the chef’s personal preferences.
B) They assign importance to each ingredient in the dish.
C) They represent the dish’s ingredients.
D) They make the dish taste better.

Question 2: How does a neural network learn from its errors?

A) By avoiding cooking altogether.
B) By making gradual adjustments to weights.
C) By adding more spices to the dish.
D) By trying a different recipe.

Question 3: Why are biases important in a neural network?

A) They ensure that the chef follows the recipe precisely.
B) They add randomness to the cooking process.
C) They influence the chef’s personal taste in flavors.
D) They are not essential in neural networks.

Question 4: What does training in a neural network involve?

A) Cooking a perfect dish on the first attempt.
B) Repeatedly practicing and adjusting the recipe.
C) Ignoring the learning process.
D) Memorizing the recipe.

Question 5: In the context of neural networks, what does optimization refer to?

A) Finding the best cooking method for a dish.
B) Making the dish taste terrible.
C) Using the recipe exactly as it is.
D) Cooking just once to save time.

1B – 2B – 3C – 4B – 5A

Git Harmony: Branch and Merge

Today, we’ll explore the concepts of branches and merging, which are fundamental to collaborative and organized development with Git.

Learn About Branches and Why They’re Important

A branch in Git is like a separate line of development. It allows you to work on new features, bug fixes, or experiments without affecting the main project until you’re ready. Here’s why branches are essential:

  • Isolation: Branches keep your work isolated, so it won’t interfere with the main project or other developers’ work.
  • Collaboration: Multiple developers can work on different branches simultaneously and later merge their changes together.
  • Experimentation: You can create branches to test new ideas without committing to them immediately.

Create and Switch Between Branches

Creating a New Branch (git branch):

To create a new branch, use the following command, replacing branchname with a descriptive name for your branch:

git branch branchname


Switching to a Branch (git checkout):

To switch to a branch, use the git checkout command:

git checkout branchname

Creating and Switching to a New Branch in One Command (git checkout -b):

A common practice is to create and switch to a new branch in one command:

git checkout -b newbranchname

Understand How to Merge Branches

Merging a Branch into Another (git merge):

After making changes in a branch, you can merge those changes into another branch (often the main branch) using the git merge command.

# Switch to the target branch (e.g., main)
git checkout main
# Merge changes from your feature branch into main
git merge feature-branch

Git will automatically integrate the changes from the feature branch into the main branch, creating a new commit.

Branching and merging are powerful tools for managing complex projects and collaborating effectively with others.


Question 1: What is the primary purpose of using branches in Git?

a) To clutter your project with unnecessary files.
b) To prevent any changes to the main project.
c) To isolate different lines of development and collaborate on new features or fixes.
d) To merge all changes immediately.

Question 2: Which Git command is used to create a new branch?

a) git make
b) git branch
c) git create
d) git newbranch

Question 3: How can you switch to a different branch in Git?

a) Use `git switch branchname`.
b) Use `git change branchname`.
c) Use `git checkout branchname`.
d) Use `git swap branchname`.

Question 4: What does the git merge command do in Git?

a) It deletes a branch.
b) It creates a new branch.
c) It integrates changes from one branch into another.
d) It renames a branch.

Question 5: Why might you want to create a branch for a new feature or experiment in Git?

a) To immediately apply changes to the main project.
b) To make your project look more complex.
c) To work on new ideas without affecting the main project.
d) To confuse other developers.

1C – 2B – 3C – 4C – 5C

Importance of Monitoring in DevOps

Hello! As we venture further into the world of DevOps, one of the core pillars we’ll explore today is Monitoring and Logging. Monitoring and logging are essential components of any DevOps strategy, and they play a crucial role in ensuring the health, performance, and reliability of your applications and infrastructure.

Why is Monitoring Important in DevOps?

Monitoring is like the radar of DevOps, providing continuous visibility into your systems. Here are some reasons why monitoring is vital:

  1. Early Issue Detection: Monitoring helps detect issues and anomalies in real-time or near real-time, allowing you to address them before they escalate into critical problems.
  2. Performance Optimization: It enables you to identify bottlenecks and performance issues, helping you fine-tune your applications and infrastructure for optimal performance.
  3. Resource Utilization: Monitoring helps you keep an eye on resource consumption, ensuring that you are not over-provisioning or under-provisioning resources.
  4. Scalability: By monitoring application load and resource usage, you can make informed decisions about scaling your infrastructure horizontally or vertically.

Introduction to Monitoring Tools (e.g., Prometheus, Grafana)

Prometheus:

  • Prometheus is an open-source monitoring and alerting toolkit built specifically for reliability and scalability. It is designed to collect metrics from various targets, store them efficiently, and allow you to query and visualize the data.
  • Prometheus uses a “pull” model, where it scrapes data from endpoints at regular intervals. It also has a powerful query language (PromQL) for analyzing and alerting on the collected data.

Grafana:

  • Grafana is a popular open-source visualization and analytics platform that complements Prometheus and other data sources. It allows you to create interactive and customizable dashboards for visualizing your monitoring data.
  • Grafana supports various data sources, making it a versatile tool for creating visually appealing and informative dashboards

Log Management and Analysis

Logs and Their Importance

  • Logs are records of events and activities in your systems and applications. They are invaluable for diagnosing issues, debugging, and gaining insights into system behavior.
  • Log management involves collecting, storing, and analyzing logs systematically. Centralized log management solutions make it easier to search and analyze logs across multiple servers and applications.

Examples of Log Analysis Tools

  • Elasticsearch and Kibana: Elasticsearch is a search and analytics engine, and Kibana is an open-source data visualization platform. Together, they provide a powerful solution for log management and analysis.
  • Splunk: Splunk is a well-known commercial log management and analysis tool that offers features for searching, monitoring, and alerting on log data.

Incident Response and Alerting

Incident Response

  • Incident response is the process of managing and mitigating incidents that affect the availability, integrity, or confidentiality of your systems. Incidents can be security breaches, system outages, or other unexpected events.
  • Effective incident response involves well-defined procedures, communication plans, and coordination among teams to minimize the impact of incidents.

Alerting:

  • Alerting is a critical aspect of incident response and monitoring. It involves setting up notifications and triggers that notify relevant personnel when predefined conditions or thresholds are met or breached.
  • Monitoring tools like Prometheus and Grafana allow you to set up alerts based on metrics and logs, enabling proactive incident response.

Now, let’s test your understanding with some questions:

  1. Why is monitoring important in DevOps?
    a) To increase the complexity of systems
    b) To detect and address issues in real-time
    c) To reduce resource utilization
    d) To eliminate the need for incident response
  2. Which tool is designed for collecting and querying metrics in a pull model?
    a) Elasticsearch
    b) Kibana
    c) Prometheus
    d) Grafana
  3. What is the primary purpose of Grafana in the context of monitoring?
    a) Storing log data
    b) Visualizing and analyzing monitoring data
    c) Incident response
    d) Executing queries on metrics data
  4. What are logs primarily used for in DevOps?
    a) Debugging and diagnosing issues
    b) Real-time monitoring
    c) Performance optimization
    d) Creating dashboards
  5. What is incident response in DevOps?
    a) A process for managing and mitigating incidents that affect system availability, integrity, or confidentiality
    b) A process for automating log analysis
    c) A method for increasing system complexity
    d) A tool for generating alerts

1 b – 2 c – 3 b – 4 a – 5 a

Configuration Management in DevOps

Today we’ll explore the crucial concept of Configuration Management in DevOps. Configuration Management ensures that your systems and infrastructure are consistent, reliable, and easily manageable.

Introduction to Configuration Management

Configuration Management is the practice of systematically handling changes and updates to a system’s software, hardware, and configurations. In DevOps, Configuration Management is a vital component for maintaining infrastructure, automating tasks, and ensuring the reliability of your systems.

Infrastructure as Code (IaC) Tools

Infrastructure as Code (IaC) is a key principle in Configuration Management. It treats infrastructure, including servers, networks, and storage, as code. This means you can define your infrastructure using code, making it reproducible, version-controlled, and automated.

Two popular IaC tools are Ansible and Terraform:

  • Ansible: Ansible is an automation tool that allows you to define configuration files (playbooks) in a human-readable format. It’s agentless, meaning it doesn’t require installing any software on target machines.
  • Terraform: Terraform is an infrastructure provisioning tool. It uses a declarative configuration language to define and provision infrastructure resources. Terraform provides support for various cloud providers and on-premises infrastructure.

Automating Server Configuration

Configuration Management tools like Ansible can automate server configuration, ensuring consistency and reducing manual intervention. Let’s take a look at an example of how Ansible can be used to automate the installation and configuration of software packages:

# Example: Ansible Playbook for Installing Software Packages

---
- name: Install Software Packages
  hosts: web_servers
  become: yes  # Run tasks with sudo privileges

  tasks:
    - name: Update package manager cache
      apt:
        update_cache: yes
      when: ansible_os_family == "Debian"  # Only for Debian-based systems

    - name: Install required packages
      apt:
        name:
          - nginx
          - postgresql
        state: present  # Ensure the packages are installed

In this Ansible playbook, we define tasks to update the package manager cache and install software packages like Nginx and PostgreSQL.

Managing Infrastructure as Code

Managing Infrastructure as Code (IaC) involves versioning your infrastructure code, collaborating with team members, and ensuring that your infrastructure remains in a desired and consistent state.

Version control systems like Git are used to track changes in your IaC code, enabling collaboration and providing a history of modifications. You can store your IaC code in a Git repository and use branches and pull requests for code review and collaboration.


Now, let’s conclude this week’s lesson with some questions to test your understanding:

  1. What is the primary goal of Configuration Management in DevOps?
    a) Automating server backups
    b) Managing changes and updates to system configurations
    c) Monitoring server performance
    d) Developing software applications
  2. What does Infrastructure as Code (IaC) allow you to do?
    a) Use infrastructure without writing any code
    b) Define and manage infrastructure using code
    c) Create virtual machines manually
    d) Automate software development processes
  3. Which tool is commonly used for automating server configuration in Configuration Management?
    a) Git
    b) Terraform
    c) Ansible
    d) Docker
  4. How does version control benefit Infrastructure as Code (IaC) development?
    a) It makes IaC files executable.
    b) It allows tracking changes, collaboration, and version history.
    c) It eliminates the need for server configuration.
    d) It automates software testing.
  5. Which infrastructure provisioning tool uses a declarative configuration language?
    a) Docker
    b) Ansible
    c) Git
    d) Terraform

1 b – 2 b – 3 c – 4 b – 5 d

Introduction to Containers

Imagine a container as a lightweight, standalone executable package that includes everything needed to run a piece of software, including the code, runtime, libraries, and system tools. Containers are like mini-virtual machines, but they’re more efficient and faster to start.

Containers offer several benefits:

  • Portability: Containers can run on any system that supports the containerization platform, making it easy to move applications between environments.
  • Consistency: Containers ensure that an application runs the same way across different environments, from development to production.
  • Resource Efficiency: Containers share the host operating system’s kernel, making them lightweight and efficient.

Docker Basics

Docker is the most popular containerization platform. It simplifies the process of creating, deploying, and managing containers. Here are some key concepts:

  1. Docker Image: A Docker image is a read-only template containing all the necessary instructions to create a container. Images are used as the building blocks for containers.
  2. Docker Container: A Docker container is a running instance of a Docker image. It’s isolated from the host system and other containers, making it a secure and self-contained unit.
  3. Dockerfile: A Dockerfile is a text file that defines the instructions for building a Docker image. It specifies the base image, adds files, sets environment variables, and more.

Container Orchestration with Kubernetes (Overview)

While Docker is excellent for running individual containers, when you have complex applications composed of multiple containers, you need a way to manage and orchestrate them. That’s where Kubernetes comes in.

Kubernetes is an open-source container orchestration platform that automates the deployment, scaling, and management of containerized applications. It allows you to define how your application should run, manage load balancing, handle failover, and more.

Here are some key concepts in Kubernetes:

  • Pod: The smallest deployable unit in Kubernetes, typically containing one or more containers.
  • Deployment: A Kubernetes resource that manages a set of identical pods, ensuring they are always running and scaling as needed.
  • Service: Kubernetes service provides networking and load-balancing to pods, allowing them to communicate with each other and external clients.

Now, let’s conclude this week’s lesson with some questions to test your understanding:

  1. What is a container in the context of DevOps and Docker?
    a) A lightweight virtual machine
    b) A type of virtual machine
    c) A standalone executable package with code and dependencies
    d) A physical server
  2. Which of the following is a benefit of using containers in DevOps?
    a) Containers have their own dedicated operating system.
    b) Containers are resource-intensive and slow to start.
    c) Containers ensure consistent application behavior across different environments.
    d) Containers are difficult to move between environments.
  3. What is a Docker image used for?
    a) Running a container
    b) Storing data in a container
    c) Defining the instructions for creating a container
    d) Managing multiple containers
  4. Which file is used to define the instructions for building a Docker image?
    a) Dockerfile
    b) requirements.txt
    c) app.py
    d) docker-compose.yml
  5. What is Kubernetes primarily used for in DevOps?
    a) Containerization
    b) Version control
    c) Container orchestration
    d) Load testing

1 c – 2 c – 3 c – 4 a – 5 c

Version Control and Collaboration

Hello, everyone! In this post, we’re going to explore a fundamental aspect of software development and DevOps: Version Control and Collaboration.

Introduction to Version Control Systems (VCS)

Version Control is the practice of tracking and managing changes to code and other digital assets.

It plays a crucial role in enabling collaboration among team members and maintaining a history of changes made to a project. One of the most common tools used for version control is a Version Control System (VCS).

Git Fundamentals

Git is the most widely used VCS in the DevOps and software development world. It was created by Linus Torvalds, the same person who created Linux. Git allows developers to:

  • Track changes in their code.
  • Collaborate with team members.
  • Maintain different versions of their software.

Basic Git Concepts

Let’s dive into some basic Git concepts:

  1. Repository (Repo): A Git repository is like a project folder that contains all the files and history of a project.
  2. Commit: A commit is a snapshot of the project at a particular point in time. It includes changes made to files.
  3. Branch: A branch is a separate line of development within a repository. It allows multiple developers to work on different features or bug fixes simultaneously.
  4. Merge: Merging combines changes from one branch into another, typically used to integrate new features or bug fixes.
  5. Pull Request (PR): In Git-based collaboration, a pull request is a way to propose changes to a repository. It allows team members to review and discuss code changes before merging them into the main branch.


Now, let’s conclude this post with some questions to test your understanding:

1) What is the primary purpose of a Version Control System (VCS) like Git?
a) To track and manage changes to code and other digital assets.
b) To compile code and create executable files.
c) To write documentation for software projects.
d) To host and run web applications.

2) What is a Git repository (Repo)?
a) A branch of code in Git.
b) A project folder that contains all the files and history of a project.
c) A code review process in Git.
d) A commit in Git.

3) What is a Pull Request (PR) in Git-based collaboration?
a) A request to add new features to a Git repository.
b) A request to delete a branch in Git.
c) A request to merge changes into a repository after review.
d) A request for technical support in Git.

4) What does it mean to “commit” changes in Git?
a) To delete files from a repository.
b) To take a snapshot of the project’s state at a particular point in time.
c) To create a new branch in Git.
d) To merge changes from one branch into another.

5) Why is branching important in Git-based collaboration?
a) Branching is not important in Git.
b) Branches allow multiple developers to work on different features or bug fixes simultaneously.
c) Branches are used to permanently delete code.
d) Branching slows down the development process.

1 a – 2 b – 3 c – 4 b – 5 b

Navigating the Git Workflow

In the previous post of this series, you learned how to create a Git repository, stage changes, and make your first commit. Now, let’s dive deeper into understanding the Git workflow.

Explore the Basic Git Commands

1. git init
  • As you’ve learned before, git init initializes a new Git repository in your project folder.
  • It’s a one-time setup for each project.
2. git add
  • Use git add to stage changes you want to include in your next commit.
  • You can add specific files, like git add filename, or all changes with git add ..
3. git commit
  • After staging changes, commit them using git commit.
  • Remember to provide a meaningful commit message: git commit -m "Your commit message here".

Understand the Concept of the Git Workflow

The Git workflow is a series of steps you follow when working with Git to manage your project’s version history.
It helps you keep track of changes, collaborate with others, and maintain a clear history of your project. Here’s a more detailed explanation with examples:

1. Create or Clone a Repository

Creating a New Repository (git init):

  • Imagine you’re starting a new coding project called “MyApp.”
  • You navigate to your project folder in the terminal:

cd path/to/MyApp

  • To initialize a new Git repository, simply run:

git init

Cloning an Existing Repository (git clone):

  • Alternatively, if you want to work on an existing project hosted on a platform like GitHub, you can clone it to your local machine.
  • For instance, if you find a project on GitHub called “AwesomeApp,” you can clone it with:

git clone https://github.com/username/AwesomeApp.git

2. Make Changes

Now that you have a Git repository set up, you can start making changes to your project. For example, you might add new files, modify existing ones, or delete unnecessary ones.

# Create a new file
touch index.html

# Edit an existing file
nano app.js

# Delete a file
rm oldfile.txt

3. Stage Changes (git add)

Not all changes you make are automatically saved in Git. You need to tell Git which changes you want to include in the next commit. This is where the staging area comes in.

  • To stage specific files for a commit, use git add filename:

git add index.html git add app.js

  • To stage all changes, use git add .:

git add .

4. Commit Changes (git commit)

Once you’ve staged your changes, you’re ready to create a commit. A commit is like taking a snapshot of your project at a specific point in time.

git commit -m "Add index.html and update app.js"

Make sure to provide a meaningful commit message. This helps you and others understand what this commit does.

5. View History (git log)

You can use git log to see a history of your commits, including their unique identifiers, authors, timestamps, and commit messages.

git log

6. Collaborate and Share

If you’re working with others, you can push your commits to a remote repository using git push and pull their changes with git pull.

# Push your commits to a remote repository
git push origin main
# Pull changes from a remote repository
git pull origin main

7. Resolve Conflicts (When Needed)

In collaborative projects, sometimes two people may edit the same part of a file, leading to conflicts. Git provides tools to help you resolve these conflicts, ensuring your changes are integrated correctly.

That’s a basic overview of the Git workflow! Remember, Git allows you to manage your project’s history efficiently and collaborate seamlessly with others. As you gain experience, you can explore more advanced features like branching for parallel development.


Question 1: What is the purpose of the staging area in the Git workflow?

a) To automatically save all changes made to your project.
b) To view the commit history of your project.
c) To select which changes should be included in the next commit.
d) To undo all changes made to your project.

Question 2: What command is used to initialize a new Git repository in your project folder?

a) git start
b) git create
c) git init
d) git setup

Question 3: When you create a commit in Git, what should you include in the commit message?

a) Your favorite song lyrics.
b) A brief description of your changes.
c) Your project's entire history.
d) The name of your computer.

Question 4: In the Git workflow, what comes after “View History”?

a) Make Changes
b) Collaborate and Share
c) Stage Changes
d) Resolve Conflicts

Question 5: What command is used to push your commits to a remote repository in Git?

a) git send
b) git upload
c) git push
d) git pull

1C. -2C – 3B – 4B – 5C

Activation functions in Neural Network

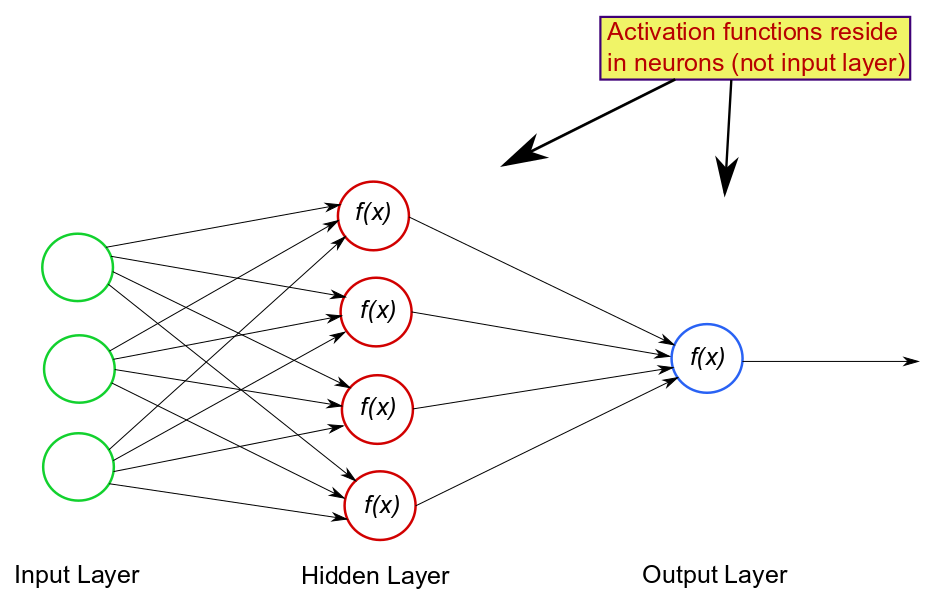
Activation functions are a crucial component of artificial neural networks, and they play a fundamental role in determining the output of a neuron or node within the network. Imagine a neural network as a collection of interconnected nodes or neurons, organized into layers. Each neuron takes inputs, processes them, and produces an output that gets passed to the next layer or eventually becomes the final output of the network.

The purpose of an activation function is to introduce non-linearity into the network. Without activation functions, no matter how many layers you add to your neural network, the entire network would behave like a single-layer linear model. In other words, it wouldn’t be able to learn complex patterns and relationships in the data.

Here are some key points to understand about activation functions:

  1. Non-linearity: Activation functions introduce non-linearity to the neural network. This non-linearity allows the network to model and learn complex relationships in the data. Without non-linearity, the network could only learn linear transformations, which are not sufficient for solving many real-world problems.
  2. Thresholding: Activation functions often involve a threshold or a turning point. When the input to a neuron surpasses a certain threshold, the neuron “activates” and produces an output. This activation is what enables the network to make decisions and capture patterns in the data.
  3. Common Activation Functions: There are several common activation functions used in neural networks, including:
    • Sigmoid Function: It produces outputs in the range (0, 1) and is historically used in the output layer for binary classification problems.
    • Hyperbolic Tangent (tanh) Function: Similar to the sigmoid but produces outputs in the range (-1, 1), making it centered around zero.
    • Rectified Linear Unit (ReLU): The most popular activation function, ReLU returns the input for positive values and zero for negative values. It’s computationally efficient and has been successful in many deep learning models.
    • Leaky ReLU: An improved version of ReLU that addresses the “dying ReLU” problem by allowing a small, non-zero gradient for negative inputs.
    • Exponential Linear Unit (ELU): Another variation of ReLU that smooths the negative values to avoid the dying ReLU problem.
  4. Choice of Activation Function: The choice of activation function depends on the problem you’re trying to solve and the architecture of your neural network. ReLU is often a good starting point due to its simplicity and effectiveness, but different problems may benefit from different activation functions.
  5. Activation Functions in Hidden Layers: Activation functions are typically applied to the output of neurons in hidden layers. The choice of activation function in the output layer depends on the type of problem (e.g., sigmoid for binary classification, softmax for multi-class classification, linear for regression).

In summary, activation functions are crucial elements in neural networks that introduce non-linearity, allowing the network to learn complex patterns and make decisions. Understanding how different activation functions work and when to use them is essential for building effective neural network models.


Question 1: What is the primary role of an activation function in a neural network?

A) To calculate the weight updates during training.
B) To introduce non-linearity into the network.
C) To determine the number of hidden layers.
D) To initialize the weights of the neurons.

Question 2: Which of the following activation functions is commonly used in the output layer for binary classification problems?

A) Sigmoid
B) ReLU
C) Tanh
D) Leaky ReLU

Question 3: What is the key benefit of using the ReLU activation function in neural networks?

A) It guarantees convergence during training.
B) It returns values in the range (-1, 1).
C) It smoothly smooths the negative values.
D) It is computationally efficient and helps mitigate the vanishing gradient problem.

Question 4: Which activation function is an improved version of ReLU designed to address the “dying ReLU” problem?

A) Sigmoid
B) Hyperbolic Tangent (tanh)
C) Leaky ReLU
D) Exponential Linear Unit (ELU)

Question 5: In a neural network, where are activation functions typically applied?

A) Only in the input layer.
B) Only in the output layer.
C) Only in the first hidden layer.
D) At the output of neurons in hidden layers.

1B – 2A – 3D – 4C – 5D