Docker Container with Java and MySql

We need now a container that should be able to execute a spring boot application (jar) and a linked mysql db.

For this we need a docker compose file and a Dockerfile

Dockerfile for Java

FROM openjdk:11
COPY ./app ./app
CMD java -Djava.net.preferIPv4Stack=true -jar /app/JavApp.war

In this example we use the java version 11 (openjdk)

Then we copy all file (actually only the jar file) from our local folder (./app) to the container folder (/app)

Finally we execute the command line to execute the jar file, adding also some java parameter

Docker compose for java and mysql

version: "3.8"
services:
  mysqldb:
    image: mysql
    environment:
      MYSQL_ROOT_PASSWORD: thisIsTheRootPwd
      MYSQL_DATABASE: fconsulting
      MYSQL_USER: fconsuser
      MYSQL_PASSWORD: fconspassword
    ports:
      - "3306:3306"
    volumes:
      - ./dbdata:/var/lib/mysql
  app:
    depends_on:
      - mysqldb
    build: 
      context: .
      dockerfile: Dockerfile
    ports:
      - 8081:8080
    environment:
      JDBC_CONNECTION_STRING: 'jdbc:mysql://mysqldb:3306/fconsulting?allowPublicKeyRetrieval=true&useSSL=false'
      JDBC_PWD: 'fconspassword'
      JDBC_USER: 'fconsuser'
      ClientId: '...'
      ClientSecret: '...'
      mongourl: 'mongodb+srv://...'
    stdin_open: true
    tty: true

In the same folder of Dockerfile we have our docker compose yaml file. The most intersting part is the environment field in which we specify all the system props needed by our java application

REST API Error handling

In this article we saw, in general, which HTTP methods and status code to use in CRUD operation.

Now let’s see better which http status code to use in our API.

There are more than 70 status code, but I suggest to use only the common ones.

HTTP Status codeWhen to use
200 OKall GET, PUT, DELETE
201 Createdafter insert (POST)
400 Bad RequestClient wrong params
404 Not Foundduring a GET and the object is not found
401 Not Authorized
403 Forbidden
500 Internal Server Errorin every back end issue

Standard Error Template

{
  text: "message",
  timestamp: new Date(),
  method: httpMethod,
  endpoit: endpointInformation,
  errors: [
    {
      code: codeSpecificApplication, 
      text: "errorMessage",
      hints: ["hints to help the user", "hint 2", ...],
      info: "Link to more info"
}
  ],
  payload: {request payload} (optional, just for debug)
}
Container with Apache, PHP and MySql

Create a new file named docker-composer.yml

version: "3.8"
services:
  php:
    container_name: php8apache
    image: php:8.1-apache
    volumes:
      - ./html:/var/www/html
    ports:
      - 8080:80
 

version: “3.8” is the docker compose version to use

services: is the section where to specify all the pieces of our composition

php: is the service name, you can name it as you want

container_name is an optional filed in which you specify the name of this service container

image: php:8.1-apache, means that our service will be implemented starting from php image and version 8.1-apache

volumes: – ./html:/var/www/html in this case we are associating our local folder ./html to the container folder /var/www/html

ports: – 8080:80 we are binding the local port 8080 to the container port 80

To execute the container with docker compose let’s type the following code:

docker-compose up -d

After it finishes to download artifacts we can try to reach the address http://localhost:8080

Try to personalize the index.php page in the folder ./html adding a index.php file

Add MySql service

At the bottom of our docker yaml file we should add a new mysql service:

version: "3.8"
services:
  php:
    container_name: php8apache
    image: php:8.1-apache
    volumes:
      - ./html:/var/www/html
    ports:
      - 8080:80
    depends_on: 
      - mysql
  mysql:
    image: mysql
    environment:
      MYSQL_ROOT_PASSWORD: thisIsTheRootPwd
      MYSQL_DATABASE: fconsulting
      MYSQL_USER: fconsuser
      MYSQL_PASSWORD: fconspassword
    ports:
      - "9906:3306"

We added the mysql section defining environment parameters and ports to map

The image used is mysql (:latest)

Moreover we added also the depend_on parameter in the php section, because our php service depends on the mysql service to work.

But that is not enough, because, like we would do in a normal environment, we need to install in our container also the php library to make php work with mysql.

To do so we need a Dockerfile in which we specify the php-apache version + the libraries we need.

So create a Dockerfile in the same folder of docker-compose.yaml (actually you can create this docker file wherever you want) and put this code:

FROM php:8.1-apache
RUN docker-php-ext-install mysqli && docker-php-ext-enable mysqli
RUN apt-get update && apt-get upgrade -y

FROM php:8.1-apache is the image that we already specified in the docker-compose file

RUN … are the linux commands to download libraries and download updates

Because we are using a Dockerfile to download the image we should update the docker compose file removing, from php section, the “imagine” section replacing it with the docker section:

version: "3.8"
services:
  php:
    container_name: php8apache
    build: 
      context: .
      dockerfile: Dockerfile
    volumes:
      - ./html:/var/www/html
    ports:
      - 8080:80
    depends_on: 
      - mysql
  mysql:
    image: mysql
    environment:
      MYSQL_ROOT_PASSWORD: thisIsTheRootPwd
      MYSQL_DATABASE: fconsulting
      MYSQL_USER: fconsuser
      MYSQL_PASSWORD: fconspassword
    ports:
      - "9906:3306"

in the build section we specify from which dockerfile to read the imagine and eventually all the other instruction to build our layer.

Now it’s ok.

Add PhpMyAdmin

What is MySql without PhpMyAdmin? Nothing! 😛

So let’s add PhP My Admin to the docker compose:

version: "3.8"
services:
  php:
    container_name: php8apache
    build: 
      context: .
      dockerfile: Dockerfile
    volumes:
      - ./html:/var/www/html
    ports:
      - 8080:80
    depends_on: 
      - mysql
  mysql:
    image: mysql
    environment:
      MYSQL_ROOT_PASSWORD: thisIsTheRootPwd
      MYSQL_DATABASE: fconsulting
      MYSQL_USER: fconsuser
      MYSQL_PASSWORD: fconspassword
    ports:
      - "9906:3306"
  phpmyadmin:
    image: phpmyadmin
    ports:
        - '8090:80'
    environment:
        PMA_HOST: mysql
    depends_on:
        - mysql

imagine: phpmyadmin (:latest) is the original phpmyadmin imagine from docker hub

ports: – ‘8090:80’, I chose 8090 but feel free to use whatever port you want

environment: PMA_HOST, mysql it is the reference to which db to use with phpmyadmin

depends_on: – mysql, this service depends on mysql server

To access with phpmyadmin use root as user and the MYSQL_ROOT_PASSWORD as password.

That’s it

NMAP, discover devices on the (same) network

There are different tools that can discover devices connected on the same network.

The simpler one is netdiscover.

Let’s check our subnet before. Type, so

ifconfig

to discover our ip address and so our subnet

let’s say that our ipaddress is 192.168.1.10

Our subnet is 192.168.1 so all the other device connected on the same subnet are in the following range

192.168.1.0/24 <== it means from 192.168.1.0 to 192.168.1.254

To discover all the other devices connected to the same subnet using netdiscover, type:

netdiscover -r 192.168.1.0/24

The result will show you the list of all devices connected:

Currently scanning: Finished! | Screen View: Unique Hosts
33 Captured ARP Req/Rep packets, from 12 hosts. Total size: 2094

IP At MAC Address Count Len MAC Vendor / Hostname

192.168.1.1 e4:8f:34:37:ba:04 20 1200 Vodafone Italia S.p.A.
192.168.1.12 3c:22:fb:b8:8c:c6 1 60 Apple, Inc.
192.168.1.4 5a:92:d0:37:82:da 1 60 Unknown vendor
192.168.1.7 c8:6c:3d:96:65:96 1 174 Amazon Technologies Inc.
192.168.1.6 74:d4:23:c0:e4:88 2 120 Unknown vendor
192.168.1.9 7c:8b:ca:1b:d8:31 1 60 TP-LINK TECHNOLOGIES CO.,LTD.
192.168.1.3 20:f4:78:1c:ed:dc 1 60 Xiaomi Communications Co Ltd
192.168.1.15 7c:8b:ca:1b:d8:31 1 60 TP-LINK TECHNOLOGIES CO.,LTD.
192.168.1.2 80:35:c1:52:d8:e3 1 60 Xiaomi Communications Co Ltd
192.168.1.13 38:1f:8d:ed:70:d2 1 60 Tuya Smart Inc.
192.168.1.11 80:0c:f9:a2:b0:5e 1 60 Amazon Technologies Inc.
192.168.1.124 b8:27:eb:26:8c:04 2 120 Raspberry Pi Foundation

The netdiscover tool can show ipaddress, mac address and the vendor of the device.

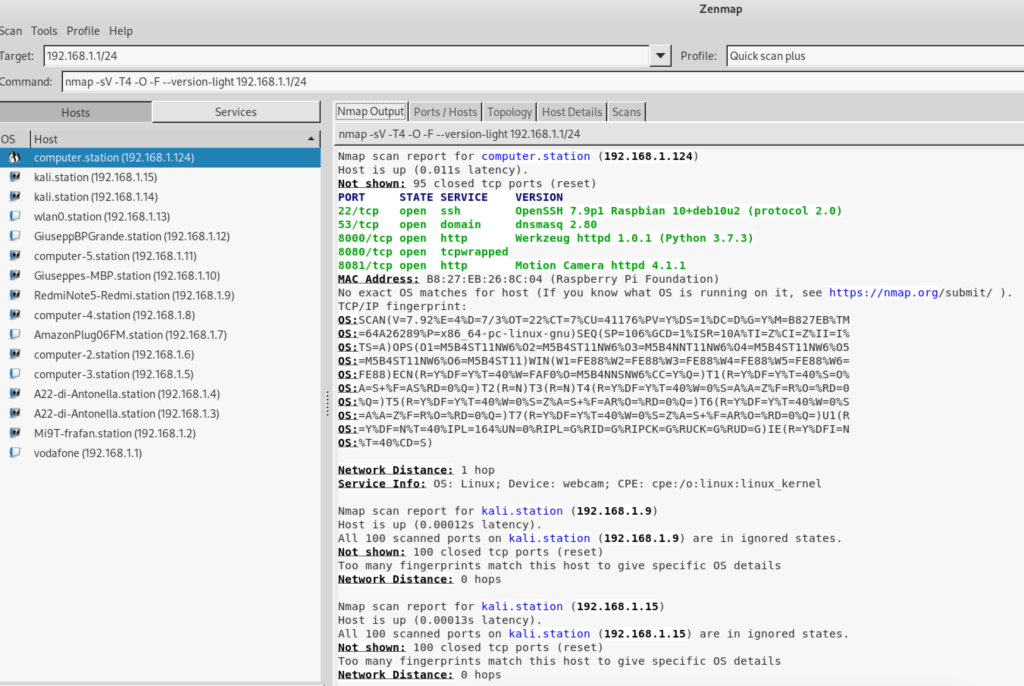
A most powerfull tool is nmap

nmap stands for Network MAPping, and is a tool, like netdiscover, that can find devices in your network but will show more information than netdiscover, like open port, services, OS version, …

The visual interface tool for nmap is Zenmap

With Zenmap you can choose graphically which comman on nmap to use.

With Zenmap you can choose different type of scan, for instance, and it basically translate your choose in a nmap command.

For instance, if you choose a °quick scan plus° choise it will execute the command

nmap -sV -T4 -O -F --version-light 192.168.1.1/24

with nmap you can scan a single website or multiple as well, to check port and services exposed

for instance to check google open port and service you can type

nmap google.com

Detect firewall

sudo nmap -sA <ipadress>

To identify Hostnames  

sudo nmap -sL <ipadress>

We use “sL” option to find hostnames for the given host by completing a DNS query for each one.

Implementing REST API CRUD operations

Basically you should follow these principles:

Use the correct HTTP method

Use the correct HTTP status code

HTTP method

HTTP methodOperation
POSTCreate (or all NOT idempotent operations)
GETRead or Retrieve
PUTUpdate all fields of a resource (basically replace it)
PATCHUpdate only part of a resource
DELETEDelete

HTTP response status

HTTP status codeDescriptionExample
1xxInformational100 Continue
2xxSuccess200 OK
3xxRedirection307 Temporary Redirect
4xxClient Error404 Not Found
5xxServer Error500 Internal Server Error
Container

A Container ia basically an Image that is executed.

To execute a container you can use the following command:

docker container run [OPTIONS] <imagename> [COMMAND] [ARG]

where

[OPTIONS], is the flags used to execute the command

[COMMAND] is the instruction that you could execute the container if we don’t like the default command inside the image

[ARG] is the param that we can pass to the container

What does it happen when we launch a container?

First of all Docker tries to find the image locally. If it doesn’t find it it serach into Docker hub.

If we don’t specify a tag the “latest” will be used.

And finally we have our container!

Docker will assign a virtual IP in the private network of the container. After that the binding will be executed

Example

To see all important aspects let’s instantiate a nginx container sing 1.19.5-alpine image

P.S.: Alpine is a Linux distribuition

docker container run -it --rm -d -p 8080:80 --name web nginx:1.19.5-alpine

where:

-it, is a combination of -i and -t, where -i means interact with the standard input and -t interact with the container with a tty interface

-rm, the container will be automatically deleted once terminated

-d, once instantiated the execution will be in background mode

-p 8080:80, the container port 80 will be linked to the 8080 port of the host

–name web, give the “web’ name to the container

once executed you can reach the server at the address http://localhost:8080

Add a volume

In order to associate a local volume (folder) to a container folder we need to add a param in our command line which map our local folder to container folde:

-v /your/local/folder:/container/folder

So the new complete command line will be:

docker container run -it --rm -d -p 8080:80 --name web -v /your/local/folder:/container/folder nginx:1.19.5-alpine

In our specific example, we would point the container folder /usr/share/nginx/html, in which there is the html folder for nginx to our local, previously created, folder /Users/xxx/nginx/html, to override that specifi folder

docker container run -it --rm -d -p 8080:80 --name web -v /Users/xxx/nginx/html:/usr/share/nginx/html nginx:1.19.5-alpine
MAC Address

MAC stands for Media Access Control.

It is a Permanent, Physical, Unique (in the world) “code” assigned to a physical object that allows to connect to a network. This code is the address assigned by the device manufacture.

A MAC address is something like this:

00:11:22:33:44:55

It’s composed by 6 octets. First 3 represent the company that made the device (Organizationally Unique Identifier). The other 3 represent are assigned by the producer and has to be unique inside it.

This address never changes. It will be always the same.

The mac address is used to identify devices on the network.

So every packet that is sent in the network has a source MAC address and a destination MAC address.

Why to change MAC address

  • Because of above, changing your MAC address will make you anonymous in the network,
  • If there is a filter in the network configuration you can bypass it
  • You can “impersonate” another device changing you MAC with the one you want to impersonate,

How to change the MAC address

first of all let check which network interface we have. Let’s execute the following commanf:

ifconfig

The result will contain all your network interfaces.

The MAC address is the code just after the ether label, and it is in the form like xx:xx:xx:xx:xx:xx

In order to change it first we must disabled that interface, with the following command:

ifconfig <interfacename> down

Then we change the MAC address specifying that we want to change the hardware address “hw ether

ifconfig <interfacename> hw ether 00:11:22:33:44:55

Finally we eneble the network interface

ifconfig <interfacename> up

The original MAC address is back once the device is restarted

REST API Endpoint, Resources, Action

Endpoints

To invoke a REST AP you need an endpoint or url.

A url consists of multiple parts.

Best Practice

  • Avoid www domain
  • keep your base URL simple (host+port+application context). Easy to remember
  • If possible use a subdomain (for instance api.yourdomain.com)

Resources

Don’t use verb but just resource name. For instance, don’t use /getItems but simply /items

Specify resource name as plural

Actions

Actions are operation that we ask the system to perform, but they are not CRUD.

/estimates or /buy or /print and so on.

They are mainly POST and PUT, but we may have GET for search actions followed by the parameters for the search

Associations

Associations are resources that contain other resources.

In these cases the rest endpoint could be nested. For example

/items/{id} returns the item details, and /items{id}/reviews or items{id}/photos to return other resources contained in the main item resource

To get a single resource contained in another resource the we will add as last parameter the id of the subresource. For instance items{id}/photos/{idPhoto}

Avoid deep nesting, let’s say 3 levels

Dockerizing

if we want to create images we need a file: Dockerfile.

It is a sort of assembler of different pieces. Each of this piece is a layer

It also specifies how the container will be built

SINTAX

FROM

Each Dockerfile must start with FROM.

It specifies the imagine from which to start. For instance:

FROM alpine:latest

ARG

In some case it is possible to add an variable to pass as an argument to the FROM command

for instance:

ARG IMG_VERSION=latest
FROM alpine:${IMG_VERSION}

RUN

RUN command allows to execute one o more instructions, defined in bash command, in a new layer.

Adding in this way an immutable block to the image

CMD

CMD is the default instruction to execute the Container.

Basically it means that at the run of the container this instruction will be executed.

It is executed every time the container starts.

it is like the RUN command but the difference is that the RUN command is executed during the build, the CMD command is not included into the build, but it is executed every time the container is started.

Let’s try to create an image

create a folder in which we will create our artifacts

mkdir dockerfolder

inside this folder create the file Dockerfile

nano Dockerfile

and inside the file past this content:

ARG VERSION=3.8

FROM alpine:$VERSION

LABEL maintainer="gf@fconsulting.tech"

ARG VERSION

# RUN command in bash mode
RUN echo $VERSION

# RUN COMMAND in exec mode
RUN ["echo", "$VERSION" ]

CMD [ "/bin/sh"]

Now let’s remain in the same Dockerfile folder and execute the following command:

docker image build .

if everything went well, if you execute a docker image ls you should find the new image.

To create the image with a name and tag we should add -t to the build command, something like this:

docker image build . -t ourfirstimage:0.1
Richardson Maturity Model

it is a model (developed by Leonard Richardson) that breaks down the principal elements of a REST approach into three steps: resource, HTTP verbs and hypermedia controls.

Level 0

The base step for a REST API application that uses HTTP as transport layer and nothing else.

Level 1: Resources

In this case instead of calling a generic service we call a more specialised resource service.

For instance, instead of calling “/bookHotel” and passing all information about our booking (hotel, dates, …) we should call ‘/book/hotel/date”

Level 2: HTTP verbs

In the level 2 we use HTTP methods correctly:

GET, to retrieve information (it helps also to manage client caching)

POST and PUT to create/update information, the only real difference is about idempotency:

  • PUT is for idempotency. It means that you could call the PUT service multiple time without creating the object multiple time (so theoretically for update)
  • POST is not used with idempotent service, it means that if you cal a POST service multiple time the object is created multiple times (so theoretically for insert)

When a new object is created (with PUT or POST) the server has to replay with a 201 and a url indicating where to get this new resource using the GET.

Moreover the response code 409 seems a good choice to indicate that someone else has already updated the resource in an incompatible way. It’s better than a 200 with a message string.

Finally the DELETE should be used to remove objects.

Level 3: Hypermedia controls

In the 3rd level, the server not only sends back to the client the data or object state, but also some other link to some action/service the client can call/use for that object.

For instance, if the client call /book/hotel/date, the response could contain also the link to pay that booking, or the link for the room details, and so on. This allows the client to be more independent from the url or from the services of the server.